Show support for her!
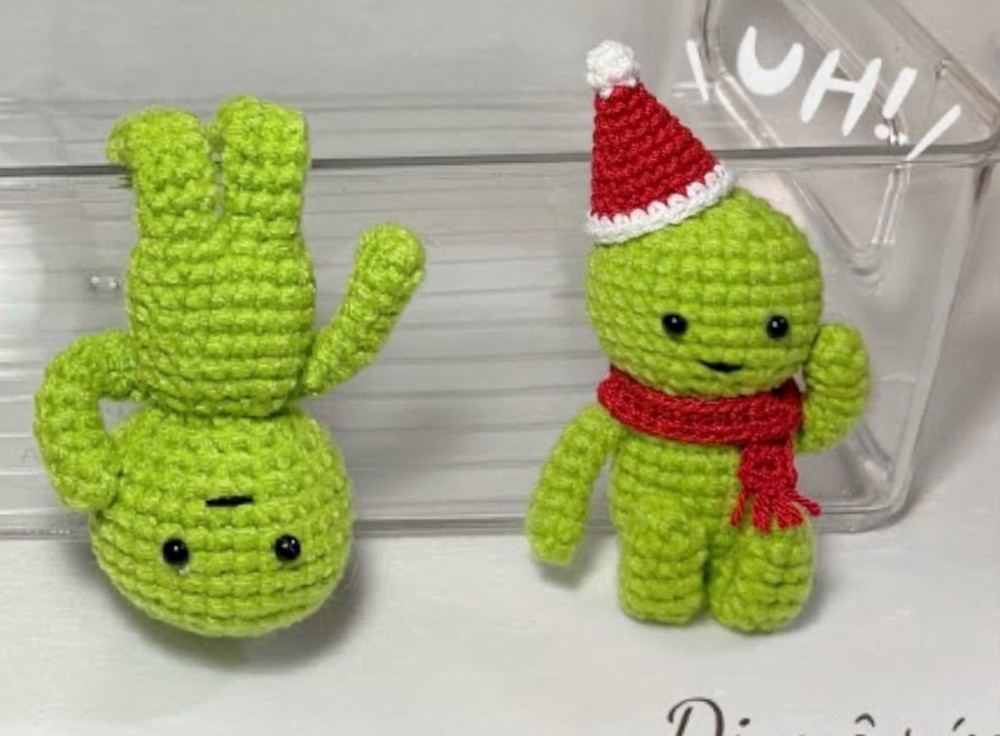
Your crochet miniature Smiski buddy is now dressed in a Santa hat and a crochet scarf and has CUTE Grinch eyebrows! This same year, I shared a FREE pattern to crochet a poseable Smiski plushie, and you all loved the pattern a lot on my other blog. Since Christmas is around the corner, I have decided to share the Smiski amigurumi pattern as a Christmas gift.
That’s why, in this tutorial, you will be learning how to crochet a CUTE Smiski buddy using cotton yarn with these cute accessories that are quick to make.
This is again a bendable green amigurumi figure with headphones. With a wire skeleton inside its body, arms, and legs, you can pose this little green buddy in all sorts of funny and cute positions – standing, sitting, hanging upside down, or lounging on your desk.
It is made using basic amigurumi stitches, so you will love it. Now, continue reading for learning more about this amigurumi crochet Smiski pattern for all skill levels!

Pattern to Crochet Amigurumi Sitting Grinch Smiski Buddy
Skill Level: Beginner – Level 6
Materials & Tools
Yarn:
Light green 5-ply milk cotton yarn (50g) for the body, head, arms, and legs
Dark green 5-ply milk cotton yarn for the headphones
A small length of black embroidery thread or yarn for the mouth
Crochet Hook: 2.5 mm
Wire: Craft wire, floral wire, or aluminum armature wire (bendable)
Stuffing: Polyester fiberfill
Eyes: 2 small black half-pearl beads or safety eyes (approx. 4 mm)
Tools:
Needle-nose pliers / wire cutters
Tapestry needle
Hot glue gun or craft glue
Scissors
Stitch marker
Abbreviations & Stitch Guide (US Terms)
MR: Magic ring
ch: Chain stitch
sc: Single crochet
inc: Increase (work 2 single crochet in the same stitch)
dec: Decrease (single crochet 2 stitches together)
sl st: Slip stitch
st / sts: Stitch / stitches
( … ) * number: Repeat the instructions inside the parentheses the indicated number of times
[number]: Total stitch count at the end of the round
Note on technique: At the end of each round on the head and headphones, join with a slip stitch (sl st) into the first stitch, then chain 1 before starting the next round. The legs and arms can be worked in continuous spirals or joined rounds.

Are you a Beginner? Learn Crocheting Easily!
You can learn to crochet better with this crochet Smiski tutorial. Or continue to the written pattern below!
1. Head (Đầu)
Use light green yarn and a 2.5 mm hook.
Round 1: Make a MR, work 6 sc into the ring. Sl st to the first sc, ch 1. [6 sts]
Round 2: Work 1 inc in each of the 6 sts around. Sl st, ch 1. [12 sts]
Round 3: (1 sc, 1 inc) * 6 times. Sl st, ch 1. [18 sts]
Round 4: (1 sc, 1 inc, 1 sc) * 6 times. Sl st, ch 1. [24 sts]
Round 5: (3 sc, 1 inc) * 6 times. Sl st, ch 1. [30 sts]
Rounds 6 to 10 (5 rounds total): Work 1 sc in each of the 30 sts around. Sl st, ch 1. [30 sts per round]
Round 11: (3 sc, 1 dec) * 6 times. Sl st, ch 1. [24 sts]
Round 12: (1 sc, 1 dec, 1 sc) * 6 times. Sl st, ch 1. [18 sts]
Round 13: (1 sc, 1 dec) * 6 times. Sl st, ch 1. [12 sts]
Fasten off yarn, leaving a short tail.
Stuff the head firmly with fiberfill, shaping it into a smooth, plump ball. Keep the 12-stitch neck opening accessible.
Materials
Yarn
Main color 5-ply yarn (for the hat body)
White 5-ply yarn (for the hat brim)
DK or Worsted weight red yarn (for the scarf)
Hooks: 2.0 mm (for the hat) & 2.5 mm (for the scarf)
Tools: Tapestry needle, scissors, yarn scrap for pom-pom
2. Legs (Chân) – Make 2
Use light green yarn and a 2.5 mm hook.
Round 1: Make a MR, work 6 sc into the ring. [6 sts]
Rounds 2 to 9 (8 rounds total): Work 1 sc in each of the 6 sts around. [6 sts per round]
First Leg: Fasten off and weave in the tail.
Second Leg: Do not cut the yarn at the end of Round 9. Continue directly to join the legs and begin the body.
3. Body (Thân)
Continue using light green yarn directly from the second leg.
Hold the two legs side-by-side. You will now crochet across both legs in one continuous round to join them:
Round 10:
On the first leg: (1 sc, 1 inc) * 3 times [9 sts].
Continue onto the second leg: (1 sc, 1 inc) * 3 times [9 sts].
Total for the round: [18 sts].
Rounds 11 to 16 (6 rounds total): Work 1 sc in each of the 18 sts around. [18 sts per round]
Round 17: (1 sc, 1 dec) * 6 times. [12 sts]
Fasten off, leaving a long yarn tail for sewing the body to the head.
4. Arms (Tay) – Make 2
Use light green yarn and a 2.5 mm hook.
Round 1: Make a MR, work 5 sc into the ring. [5 sts]
Rounds 2 to 8 (7 rounds total): Work 1 sc in each of the 5 sts around. [5 sts per round]
Fasten off, leaving a yarn tail for sewing. Do not stuff with fiberfill (wire will be inserted).
5. Wire Armature, Stuffing, and Body Assembly
Making the Leg & Spine Wire Armature:
Cut a length of craft wire (approx. 25 cm to 30 cm long).
Fold it into a U-shape to form the two legs, leaving the looped bend at the center to extend up into the torso and neck.
Use pliers to bend back the tips of the wire at the feet so there are no sharp edges.
Take a strand of light green yarn and wrap it securely around the wire stems to cushion the frame and prevent the wire from poking through the crochet stitches.
Insert the two wrapped wire ends down into the crocheted legs, pushing them all the way to the feet.
The top twisted loop of wire will stick out through the neck opening of the body.
Use tweezers or small scissors to stuff fiberfill firmly into the body around the central wire frame.
Attaching the Head:
Insert the top wire stem coming out of the neck up into the center of the head.
Align the 12 stitches of the neck opening with the 12 stitches of the head opening.
Thread the long tail from the body onto a tapestry needle and sew the head to the body securely, working through corresponding stitches around the neck. Knot and bury the yarn inside the head.
Arm Wire & Attaching the Arms:
Cut another piece of wire (approx. 15 cm long).
Using pliers, pass the wire straight through the upper body from one shoulder to the other.
Measure the wire against the crocheted arms. Fold the wire ends back at the hand tips and twist so they match the length of the arms.
Wrap green yarn around both exposed wire arms.
Slide a crocheted arm sleeve over each wire arm until the open end touches the shoulder.
Using the yarn tail on each arm, sew the open edge of the arm securely to the shoulder area of the body. Weave in and trim all yarn tails.
Face Details:
Eyes: Using hot glue or craft glue, attach the two small black beads/safety eyes on the front of the head between Rounds 8 and 9, spaced about 4 to 5 stitches apart.
Mouth: Thread a tapestry needle with black thread or yarn. Embroider a small, slightly crooked smile on the face between and just below the eyes. Tie off and conceal the thread ends inside the head.
6. Headphones (Tai nghe)
Use dark green yarn and a 2.5 mm hook.
First Ear Cup:
Round 1: Make a MR, work 6 sc into the ring. Sl st, ch 1. [6 sts]
Round 2: (1 sc, 1 inc) * 3 times. Sl st, ch 1. [9 sts]
Round 3: Work 1 sc in each of the 9 sts around. Sl st. [9 sts]
Do not cut yarn. Continue to the headband:
Headband:
Chain 15 (or adjust the chain length so it comfortably reaches across the top of your figure’s head from ear to ear).
Fasten off, leaving a tail to connect to the second ear cup.
Second Ear Cup:
Round 1: Make a MR, work 6 sc into the ring. Sl st, ch 1. [6 sts]
Round 2: (1 sc, 1 inc) * 3 times. Sl st, ch 1. [9 sts]
Round 3: Work 1 sc in each of the 9 sts around. Sl st. [9 sts]
Fasten off, leaving a tail.
Sew the free end of the 15-chain headband to the second ear cup using a tapestry needle. Weave in all loose ends.
7. Final Assembly
Place the headphones onto your figure’s head so the headband arches across the top and the two ear cups sit snugly over the sides of the head. Secure them in place with a dab of glue or a few small stitches if desired.
Your bendable green figure is now complete and ready to be posed!
Pattern Abbreviations (US Terms)
mr = magic ring
sc = single crochet
inc = increase (2 sc in the same stitch)
ch = chain
st(s) = stitch(es)
[ ] = total stitch count at the end of the round/row
Hat Pattern
Round 1: 6 sc in a magic ring [6]
Round 2: (sc, inc) × 3 [9]
Round 3: (2 sc, inc) × 3 [12]
Round 4: (3 sc, inc) × 3 [15]
Round 5: (4 sc, inc) × 3 [18]
Round 6: (5 sc, inc) × 3 [21]
Round 7: (6 sc, inc) × 3 [24]
Fasten off main color. Join white yarn in the next stitch.
Round 8: (7 sc, inc) × 3 [27]
Fasten off, weave in the ends, and attach a small handmade yarn pom-pom to the top (Round 1) of the hat.
Scarf Pattern
Worked in turned rows using red yarn and a 2.5 mm hook.
Foundation: Ch 6.
Row 1: Starting in the 2nd ch from the hook, sc across, ch 1, turn [5]
Row 2: Sc in each st across [5]
Fasten off.
Finishing:
Cut small strands of red yarn (approx. 2 inches each). Fold them in half and loop them through the stitches at both ends of the scarf to create fringes. Trim evenly.

See More:

Tester Call: How to Crochet Santa Belly Googly-Eyed Festive Dumpling in A Green Gift Box Plush

How to Crochet Grinch Mushy in Ruffle-Brim Santa Hat Miniature Amigurumi for Gifting

How to Crochet Mini Grinch Stingray in Santa Hat & Scarf Buddy Plushie for Gifting

Featuring: How to Crochet Amigurumi Mr. Gingerbread in Santa Hat Wind Spinner for Christmas
Tester Call: How to Crochet Mr. Baymax Snail in Santa Hat & Scarf with Christmas Wreath Shell Plushie
Tester Call: How to Crochet Iconic Googly Character Yellow Dumpling Plushie in Santa Hat

Featuring: Crochet No-Sew Holiday Fat Bird in Slouchy Santa Hat Plushie for Gifting

How to Crochet Plush Mr. Snow Snail with Santa Bauble Holiday Gift Plushie

Featuring: How to Crochet Funny Santa Flip-Over Coaster with Amigurumi Santa Cupcake