
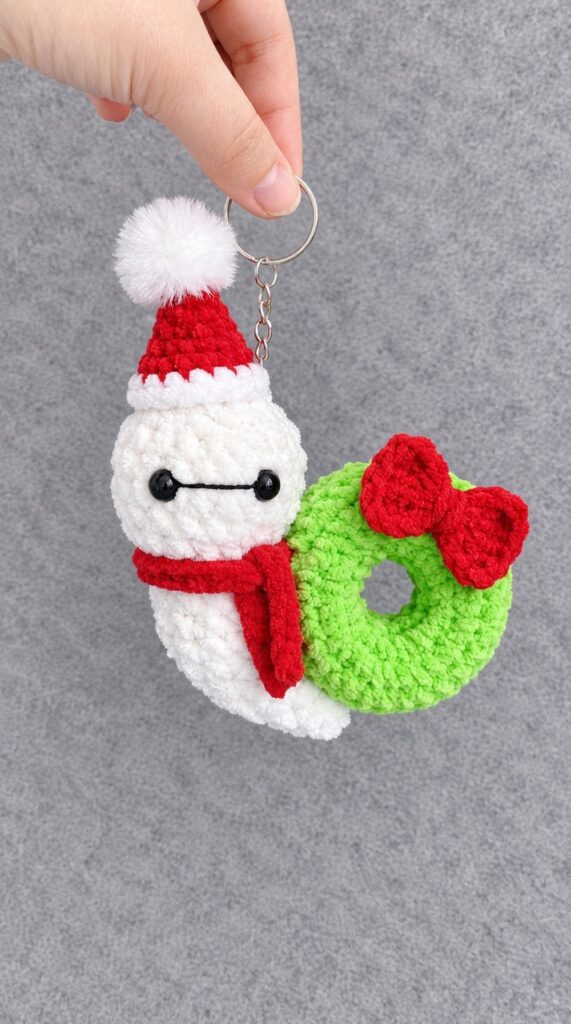
Today, learn how to crochet the MOST special variation of the crochet Christmas character snail buddy plushies! Introducing the crochet Mr. Baymax snail buddy in a Santa hat and scarf, with a donut Christmas wreath plushie. You can crochet this plush snail buddy with a bow-charmed wreath with a FREE written pattern.
I like to call it the Baymax worm plushie instead because it does not have the crochet snail horns, unlike the previous crochet buddy snail plushies, such as the reindeer snail.
We will be crocheting a CUTE snail buddy that can be used as a keychain, Christmas ornament, and even a desk buddy! So, continue reading for learning more about this plush Christmas wreath snail buddy tutorial.

Pattern to Crochet Baymax Snail Buddy Plush
Skill Level: Beginner – Level 5
Finished Size
Height / Length: Approx. 9.5 cm (3.75 in)
Materials & Tools
Yarn:
Snail Body & Head: White / Cream Super Bulky Chenille / Plush Yarn (e.g., Himalaya Dolphin Baby or Hobbii Baby Snuggle)
Wreath Panels: Green Super Bulky Chenille / Plush Yarn
Santa Hat: Red and White skinny plush yarn (or standard plush yarn) + a fluffy white pom-pom
Scarf & Bow: Red Super Bulky Chenille / Plush Yarn (and thin red plush yarn for the bow)
Smile: Thin black yarn or embroidery floss
Crochet Hooks:
4.5 mm (for Snail Body)
4.25 mm (for Wreath Panels)
3.0 mm (for Santa Hat)
Eyes: 6 mm black beads or safety eyes
Stuffing: Fiberfill / Holofiber
Tools: Tapestry needle, scissors, stitch marker, hot glue gun, keychain ring with chain (optional)
Abbreviations (US Crochet Terms)
MR: Magic Ring
ch: chain
sc: single crochet
inc: increase (2 sc in the same stitch)
dec: invisible single crochet decrease
tc: treble crochet
sl st: slip stitch
st(s): stitch(es)
[ ]: total stitch count at the end of the round
PART 1: Snail Body & Head
Worked from the tail tip up to the head in White / Cream plush yarn using a 4.5 mm hook.
Rnd 1: Ch 2, work 6 sc in the 2nd ch from hook [6]
Rnd 2: 6 sc around [6]
Rnd 3: (2 sc, 1 inc) × 2 [8]
Rnds 4–7 (4 rounds): 8 sc around [8]
Rnd 8: (3 sc, 1 inc) × 2 [10]
Rnds 9–13 (5 rounds): 10 sc around [10]
Rnd 14: 10 inc [20]
Rnds 15–17 (3 rounds): 20 sc around [20]
Rnd 18: (8 sc, 1 dec) × 2 [18]
Stuffing the Body:
Tail tip: Leave completely unstuffed so it stays flexible and curves naturally.
Middle body / neck: Stuff lightly to moderately.
Head: Stuff firmly.
Rnd 19: (1 sc, 1 dec) × 6 [12]
Rnd 20: Top up the head with fiberfill so it is plump and rounded. 12 sc around [12]
Rnd 21: 6 dec [6]
Sl st into next st, cut yarn leaving a tail. Thread tail onto a needle, pick up the front loops of all 6 sts, pull tight to close the crown, knot, and hide the yarn end inside the head.
PART 2: The Christmas Wreath (Replacing the Heart Shell)
Crocheted using Green Super Bulky Chenille yarn and a 4.25 mm hook. Make 2 identical panels.
Note on Tails: For Panel 1, leave a long initial yarn tail (approx. 12 inches) before making your slip knot AND a long tail when finishing (approx. 18–24 inches) to use for sewing the two panels together. For Panel 2, start and cut with standard-length tails.
Wreath Panel Pattern (Make 2):
Initial Chain: Slip knot, Ch 12. Form a ring by making 1 sc directly into the 1st chain made (be careful not to twist the chain ring; this first sc counts as the 1st stitch of Round 1).
Rnd 1: (1 sc, 1 inc) × 6 [18]
Rnd 2: (2 sc, 1 inc) × 6 [24]
Rnd 3: (2 sc, 1 inc) × 6 [36]
Rnds 4–6 (3 rounds): 1 sc in each st around [36]
Fasten off Panel 1 and Panel 2.
Assembling the Wreath:
Place the two green donut panels together, matching the stitches.
Using the long finishing tail from Panel 1, whipstitch or mattress stitch around the outer and inner circumferences to join them.
Before completely closing the seam, add a light amount of fiberfill inside between the panels to give it a plump, 3D wreath look, then finish closing and weave in the ends.
PART 3: The Red Bow
Crocheted with red skinny plush yarn.
Ch 5.
Round 1: Work 4 tc into the first chain. Ch 4, sl st in the same st. Ch 4, 4 tc into the same st, ch 4, sl st in the same st.
Cut yarn, leaving a long tail. Wrap the tail yarn around the center of the bow 7 times to shape it securely, tie off, and sew or glue the bow onto the top of the green wreath.
PART 4: Slouchy Santa Hat
Crocheted using Red and White skinny plush yarn and a 3.0 mm hook.
Round 1 (Red): Make a magic ring, work 4 sc in the ring [4]
Round 2 (Red): (1 sc, 1 inc) × 2 [6]
Round 3 (Red): (2 sc, 1 inc) × 2 [8]
Round 4 (Red): (3 sc, 1 inc) × 2 [10]
Round 5 (Red): (4 sc, 1 inc) × 2 [12]
Round 6 (Red): (5 sc, 1 inc) × 2 [14]
Round 7 (Red): (6 sc, 1 inc) × 2 [16]
Change to White yarn.
Round 8 (White): 16 sc, work 2 inc evenly spaced [18]
Round 9 (White): 18 sc around [18]
Fasten off and weave in all ends. Glue or securely sew the fluffy pom-pom to the top tip of the hat.
PART 5: The Scarf Pattern
Crocheted using Red Super Bulky Chenille yarn and a 4.5 mm hook.
Initial Chain: Ch 22.
Row 1: Starting in the 2nd ch from hook, work 21 sc across [21]
Fasten off, leaving neat tails at both ends to mimic scarf fringe.
PART 6: Final Assembly & Finishing Touches
Eyes:
Position two 6 mm black beads between Rnds 17 and 18 of the white head, aligned symmetrically about 4–5 stitches apart. Secure them firmly with hot glue or appropriate bead-backing glue.
Smile:
Thread a tapestry needle with thin black yarn or embroidery floss. Embroider a sweet, gentle smile centered directly below the eyes between Rnds 15 and 16. Add a tiny vertical anchoring stitch in the center of the curve so it stays neatly arched.
Santa Hat Attachment:
Position the slouchy Santa hat angled slightly over the top of the snail’s head and secure it in place with a small dot of hot glue.
Scarf Attachment:
Wrap the red scarf snugly around the snail’s neck right below the head, crossing the ends over the chest, and secure with a dab of hot glue.
Wreath Attachment:
Nestled securely where the snail’s tail meets the lower neck, place the green wreath so the back sits over the tail curve and the front rests against the lower body. Apply hot glue along the contact points and reinforce with hidden stitches using matching white/green yarn.
Keychain Ring:
If using as a keychain, securely attach a keychain jump ring and chain through the plush stitches near the top of the Santa hat or the crown of the head.
