Show support for her!
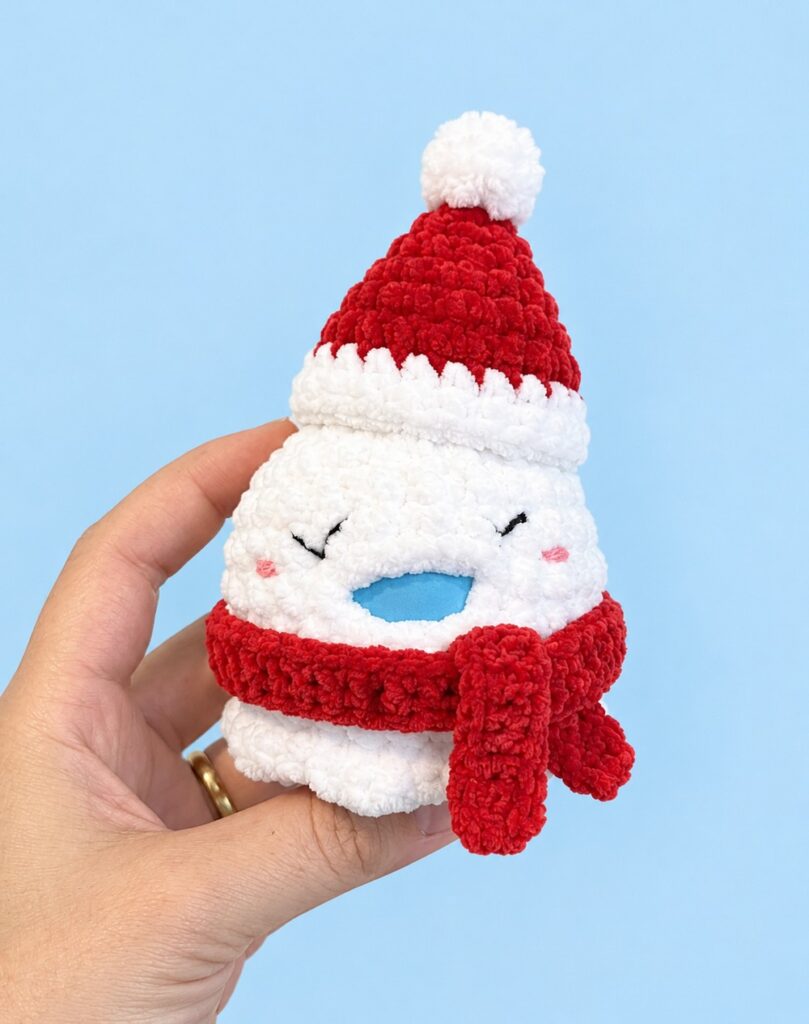
Are you looking for an absolutely EASY, UNIQUE, and last-minute squishy plush that you can charm up with Christmas accessories? Learn how to crochet this UNIQUE interactive bubble gum squishy snowball amigurumi plush with a step-by-step tutorial and a written pattern as well. This is a baloon pop-up squishy you can crochet in under 15 minutes using the super bulky yarn! The idea is as follows: instead of fiberfill stuffing, a small, slightly inflated party balloon is placed inside the snowball sphere plush with a ruffled skirt.
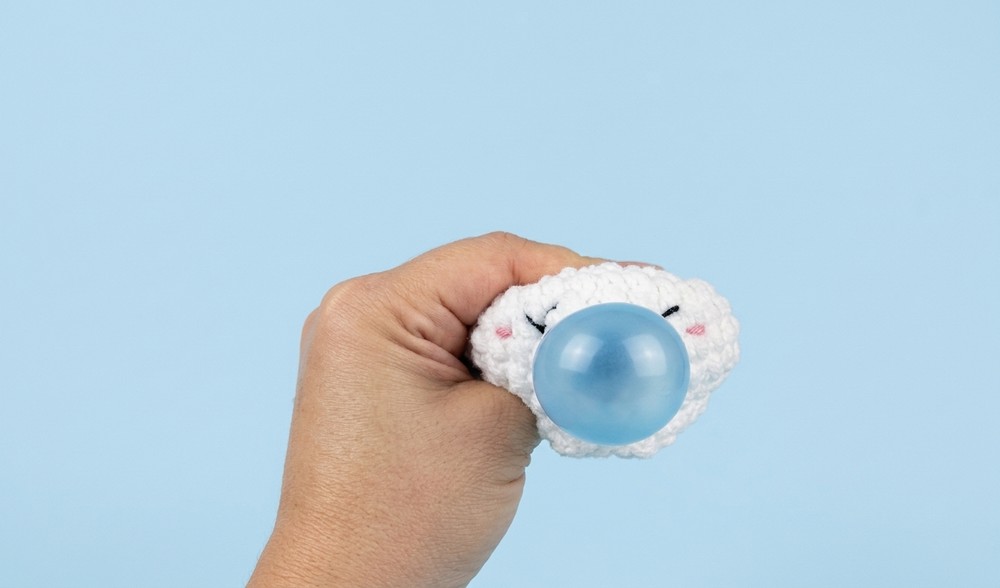
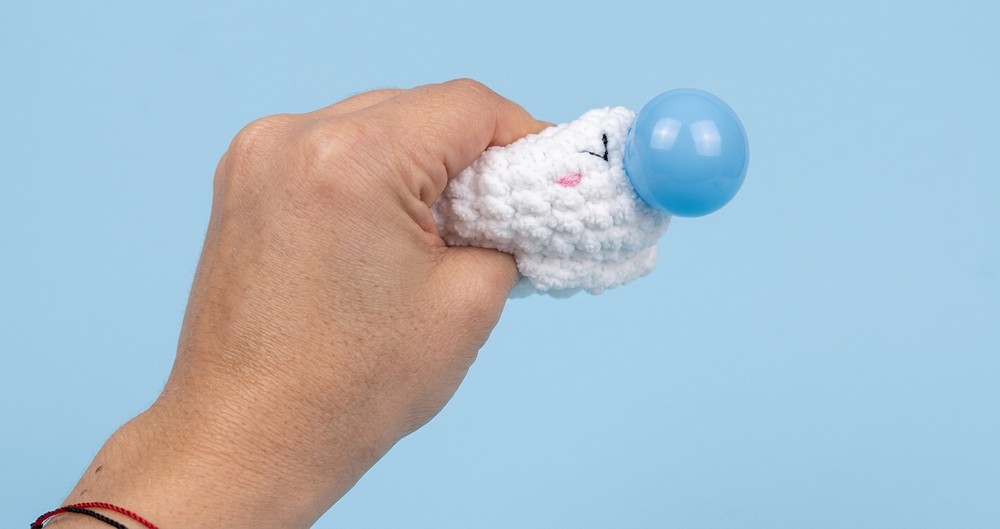
A small mouth opening is made right into the crochet stitches, which makes the pattern for this bubble gum squishy super easy. When you squeeze the snowball, the balloon pushes out through the mouth like a big bubble of chewing gum, and when you let go, it pops back inside! You can also follow my suggested hat pattern to crochet the hat!
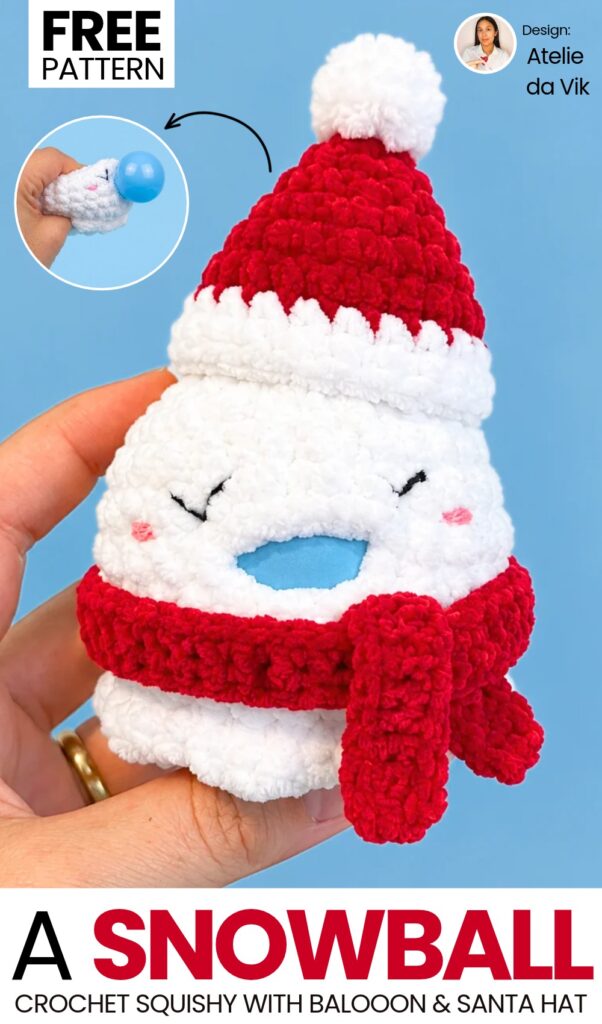
Because it is crocheted using chunky, super-soft chenille yarn, the ghost works up very quickly in just a short sitting. To protect the balloon from popping, the facial features are embroidered with soft thread rather than using plastic safety eyes with sharp backs. It makes a delightful stress toy, sensory squishy, party favor, or Halloween & Christmas desk buddy. Now, continue reading for learning more about this plush squishy project for all skill levels!
Pattern to Crochet a Snowball Squishy for Gifting
Skill Level: Beginner – Level 4
Materials & Tools
Main Yarn: Chunky Chenille / Velvet yarn in White (e.g., Círculo Amigurumi Chenille or equivalent plush velvet yarn)
Embroidery Yarn / Thread:
Thin black yarn or thread (such as Anne, Cléa, or embroidery floss) for the eyes
Thin pink yarn or thread for the blush cheeks
Crochet Hook: 4.5 mm (or a hook size recommended for your chenille yarn to keep stitches snug)
Balloon: 1 small round latex balloon, size 5 inch (blue, pink, or any color you want for the bubble gum)
Tools: Blunt tapestry needle (important: a blunt tip avoids puncturing the balloon!), stitch marker, scissors
Abbreviations (US Terms)
MR: Magic Ring
ch: Chain stitch
sc: Single crochet
inc: Increase (work 2 single crochets into the same stitch)
dec: Decrease (single crochet 2 stitches together)
BLO: Back Loop Only
FLO: Front Loop Only
sl st: Slip stitch
st / sts: Stitch / stitches
Are you a Beginner? Learn Crocheting Easily!
You can learn to crochet better with this crochet squishy tutorial. Or continue to the written pattern below!
Pattern Instructions
The body of the ghost is worked in continuous spiral rounds from the top of the head down to the base. Use a stitch marker in the first stitch of each round to keep track of your progress.
Part 1: Ghost Head & Upper Body
Using White Chenille Yarn and a 4.5 mm hook:
Round 1: Start with a Magic Ring. Work 8 single crochet into the ring. Pull the ring closed.
(Total: 8 stitches)Round 2: Work 2 single crochet into each stitch around (8 increases).
(Total: 16 stitches)Round 3: [1 single crochet in the next stitch, 1 increase in the following stitch] repeat 8 times around.
(Total: 24 stitches)Round 4: Work 1 single crochet in each stitch around.
(Total: 24 stitches)Round 5: Work 1 single crochet in each stitch around.
(Total: 24 stitches)
Part 2: Creating the Mouth Opening
In this round, a chain space is created to form the opening where the balloon will pop out.
Round 6:
Work 1 single crochet in each of the first 10 stitches.
Chain 3.
Skip the next 3 stitches on the base.
Work 1 single crochet in each of the remaining 11 stitches around.
(Total: 24 stitches, counting the 10 single crochet, the 3 chains, and the 11 single crochet)
Round 7:
Work 1 single crochet in each of the first 10 stitches.
Work 1 single crochet into each of the 3 chain loops from the previous round (3 single crochet worked along the chain).
Work 1 single crochet in each of the remaining 11 stitches around.
(Total: 24 stitches)
Round 8: Work 1 single crochet in each stitch around.
(Total: 24 stitches)Round 9: Work 1 single crochet in each stitch around.
(Total: 24 stitches)Pull the working loop up slightly so your work does not unravel while you embroider the face and prepare the balloon.
Part 3: Facial Embroidery
Do this step now while the bottom of the ghost is completely open.
1. Happy Sleeping Eyes:
Thread your needle with thin black yarn or embroidery thread.
From the inside of the ghost, bring the needle out on the round directly above the mouth opening, about 1 stitch above the corner of the mouth slit.
Make an inverted “V” shape (laughing/closed eye):
Insert the needle 2 stitches to the side and come out 1 stitch down in the middle between them.
Catch the thread in the center to shape it into a small downward point, then insert back into the same hole to secure.
Repeat for the second eye on the other side of the mouth, keeping them spaced evenly above the opening.
Tie the yarn tails into a knot on the inside of the ghost and trim.
2. Blush Cheeks:
Thread your needle with thin pink yarn.
Directly below the outer edge of each eye, make two short horizontal passes over 1 stitch to create sweet pink blush marks.
Tie off on the inside and trim excess thread.
Part 4: Preparing & Inserting the Balloon
Take a small 5-inch latex balloon.
Blow a small amount of air into the balloon—inflate it just until it forms a rounded, firm ball that matches the size of the ghost’s interior (like a small egg). Do not over-inflate it, or it will be too rigid to squeeze.
Tie a tight knot at the neck of the balloon.
Test-squeeze the balloon gently in your hand to make sure it squishes comfortably without popping.
Insert the balloon into the ghost body through the bottom opening.
Position the balloon so the smooth, rounded front presses gently against the inside of the mouth slit, and the knot points toward the bottom or back.
Part 5: Closing the Bottom
Note: Work carefully with your hook to avoid piercing the balloon.
Round 10 (in Back Loops Only):
Working in the Back Loops Only (BLO) of each stitch:
[1 single crochet in the next back loop, 1 decrease over the next 2 back loops] repeat 8 times around.
(Total: 16 stitches)
(The unworked front loops from this round will remain on the outside to form the ruffled bottom hem).
Round 11:
Work 8 decreases around.
(Total: 8 stitches)
Cut the chenille yarn, leaving a tail of about 6 inches.
Thread the tail onto a blunt tapestry needle.
Weave the needle through the front loop of all 8 remaining stitches.
Gently pull the yarn tail to close the hole (inverted magic ring).
Secure with a small knot flat against the base of the stitches (do not push the needle deep into the center where the balloon is).
Weave the yarn end between the bottom stitches and snip off the excess.
Part 6: Bottom Ruffle / Skirt (Barradinho)
Turn the ghost upside down so the bottom base is facing you. You will now crochet into the visible Front Loops left behind from Round 10.
Join the White Chenille yarn with a slip stitch into any front loop along the back or side of the ghost.
Follow this scalloped ruffle pattern all the way around:
Repeat 6 times:
In the next loop, work 3 single crochets all in the same loop.
Skip the next loop.
Slip stitch into the following loop.
In the final loop, end with a slip stitch into the base of the first ruffle.
Cut the yarn, pull through to fasten off.
Thread the yarn tails onto your blunt tapestry needle, weave them securely into the ruffle stitches, and trim any remaining ends.
How to Play
Hold the ghost in the palm of your hand and give the sides and bottom a gentle squeeze. A big, round balloon bubble will pop out of the mouth opening just like bubble gum! Release your grip, and the bubble pops right back inside.
Hat Pattern
You can use any crochet Santa hat pattern; use the following pattern as well.
Round 1: 4 SC in magic ring (4)
Round 2: [1 sc, inc] x 2 (6)
Round 3: [1 sc, inc] x 3 (9)
Round 4: [2 sc, inc] x 3 (12)
Round 5: [3 sc, inc] x 3 (15)
Round 6: [4 sc, inc] x 3 (18)
Round 7: [7 sc, inc] x 2 (20)
Round 8: 20 SC in main color (20)
Round 9: Change to white yarn, 20 SC (20)
Round 10: 20 SC in white yarn (20)
Round 11: 20 sl st in white yarn (20)
(Fasten off, weave in ends, and attach your trimmed pom-pom to the top center magic ring.) Stuff the hat tightly to give it that UNIQUE shape!
Attaching the Pom-Pom
Preparing a fuzzy yarn or faux-fur pom-pom for a tight amigurumi attachment:
Trim a Small Section: Snip away the fibers on a tiny base section of the pom-pom so you expose the core string or mesh underneath. This keeps the attachment point flat and stops fluffy fibers from getting trapped in your stitches.
Secure from the Inside: Thread the core string or a length of matching yarn through the very top center (Round 1) of the hat using a yarn needle.
Anchor Firmly: Tie a secure double knot on the inside of the hat, weaving the tails into the surrounding stitches so it won’t pull loose.
The Scarf
Just crochet two rows of sc starting with about 40 chain stitches using the plush yarn!

See More:

Tester Call: How to Crochet Santa Belly Googly-Eyed Festive Dumpling in A Green Gift Box Plush
How to Crochet Grinch Mushy in Ruffle-Brim Santa Hat Miniature Amigurumi for Gifting
How to Crochet Mini Grinch Stingray in Santa Hat & Scarf Buddy Plushie for Gifting

Featuring: How to Crochet Amigurumi Mr. Gingerbread in Santa Hat Wind Spinner for Christmas
Tester Call: How to Crochet Mr. Baymax Snail in Santa Hat & Scarf with Christmas Wreath Shell Plushie
Tester Call: How to Crochet Iconic Googly Character Yellow Dumpling Plushie in Santa Hat
Featuring: Crochet No-Sew Holiday Fat Bird in Slouchy Santa Hat Plushie for Gifting
How to Crochet Plush Mr. Snow Snail with Santa Bauble Holiday Gift Plushie

Featuring: How to Crochet Funny Santa Flip-Over Coaster with Amigurumi Santa Cupcake