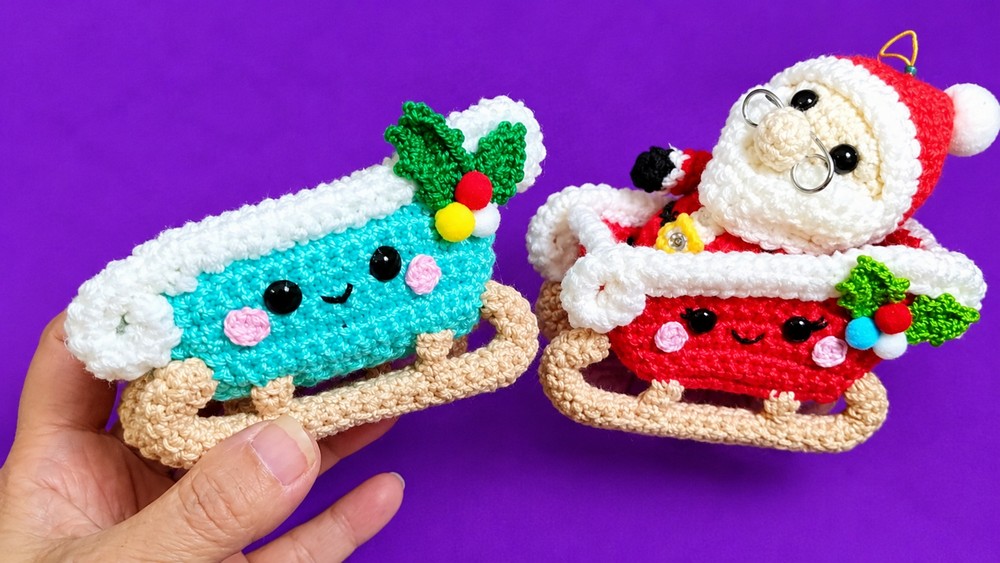
Are you looking for the CUTEST crochet Christmas gift or mini amigurumi present holder? Learn how to crochet this kawaii smiling Christmas sleigh amigurumi along with a Santa buddy amigurumi, following this step-by-step tutorial and a FREE written pattern as well. I have named this crochet cotton yarn sleigh gift holder the Santa’s Car for its cute, smiling face and a crochet Holly Leaf with blue, red, and white berry pom poms.
You can choose from the crochet aqua or red Christmas sleigh variation, following the same pattern.
Crocheted around a durable cardboard base and topped with fluffy white rolled edges, this little sleigh has plenty of room to hold mini amigurumi like Santa or Mrs. Claus, wrapped chocolates, or small holiday treats. Follow this pattern to crochet the sleigh gift holder, and the remaining pattern will be available soon in this same tutorial.

Pattern to Crochet the Aqua or Red Christmas Kart
Skill Level: Intermediate – Level 2
Materials Needed
Cotton Yarn: Number 5 cotton yarn in mint (or red, for the main sleigh body), champagne, black, and pink (mint is used in this part). Hold two strands together for all cotton crochet pieces, and use a single strand for sewing.
Acrylic Yarn: White acrylic yarn, 2 mm thickness, used as a single strand for the borders and side rails.
Crochet Hooks: 2.55 mm hook (used throughout Part 1) and 1.75 mm hook (for smaller details in Part 2).
Support Material: A strip of thin cardboard (such as from a cereal box) cut to 3 cm wide by 13 cm long.
Embellishments (used in Part 2): 3 small craft pompons, 2 black 10 mm beads for eyes, and 1 cotton swab.
Tools: Hot glue (stick with lighter or hot glue gun), stitch pins, tapestry/yarn needle, and scissors.

Abbreviations and Notes (US Crochet Terms)
ch: chain
sc: single crochet
sl st: slip stitch
inc: increase (work 2 sc into the same stitch)
sc2tog: single crochet two together (insert hook into next stitch, yarn over and pull up a loop, insert hook into following stitch, yarn over and pull up a loop, yarn over and pull through all 3 loops on the hook)
st(s): stitch(es)
Double strand: Hold two strands of number 5 cotton yarn together as one while crocheting the base and side panels.
Are you a Beginner? Learn Crocheting Easily!
Learn to crochet better with this Christmas sleigh gift holder decoration tutorial. Or continue to the written pattern below!
Step-by-Step Crochet Pattern (Part 1: Sleigh Body and Trim)
Part 1: Sleigh Base
Using two strands of mint number 5 cotton yarn held together and the 2.55 mm hook:
Foundation: Chain 11.
Row 1: Starting in the 2nd chain from the hook, work 1 sc in each chain across. (10 sts)
Rows 2 through 66: Chain 1, turn, work 1 sc in each stitch across. (10 sts per row, 66 rows total)
Fasten off, cut the yarn, and weave in both the starting and ending tails cleanly using a yarn needle.
Part 2: Sleigh Side Panels (Make 2)
Using two strands of mint number 5 cotton yarn held together and the 2.55 mm hook:
Foundation: Chain 15.
Row 1: Starting in the 2nd chain from the hook, work 1 sc in each chain across. (14 sts)
Row 2: Chain 1, turn, work 1 sc in each stitch across. (14 sts)
Row 3: Chain 1, turn, inc in the first st, work 12 sc across, inc in the last st. (16 sts)
Row 4: Chain 1, turn, work 1 sc in each stitch across. (16 sts)
Row 5: Chain 1, turn, inc in the first st, work 14 sc across, inc in the last st. (18 sts)
Row 6: Chain 1, turn, work 1 sc in each stitch across. (18 sts)
Row 7: Chain 1, turn, inc in the first st, work 16 sc across, inc in the last st. (20 sts)
Shaping the Raised Backrest Section:
Row 8: Chain 1, turn, work 7 sc across. Leave the remaining 13 stitches unworked. (7 sts)
Row 9: Turn without chaining 1. Skip the very first stitch and work 6 sc across. (6 sts)
Row 10: Turn and chain 1. Work 4 sc across, then work 1 sc2tog over the last 2 stitches. (5 sts)
Row 11: Turn without chaining 1. Skip the very first stitch and work 4 sc across. (4 sts)
Fasten off, cut the yarn, and weave the tails securely into the panel. Repeat Part 2 to make a second identical side panel.
Part 3: Assembling the Sleigh Body
Insert the Cardboard into the Base:
Fold the 66-row base strip in half lengthwise so it becomes 33 rows long and double-layered.
Cut a strip of thin cardboard to 3 cm wide by 13 cm long. Test-fit it between the two layers of the folded base so it sits centered with a small fabric margin around the open edges for sewing.
Apply a little hot glue to the cardboard and glue it neatly in place inside the folded base.
Thread a yarn needle with a single strand of mint cotton yarn. Whipstitch the three open edges closed (the two short ends and the long open edge), taking one stitch per row/stitch and weaving the tails inside when finished. Keep the folded crease edge as the top/front rim for extra strength.
Fold the Sleigh Profile:
From one end of the sewn base strip (the backrest), count 11 rows inward and place stitch pins on both side edges. Crease the cardboard and crochet firmly upward along this line to form the slanted back.
From the opposite end (the front footrest), count 7 rows inward and place stitch pins on both side edges. Crease firmly upward along this line to form the raised front lip.
Sew on the Side Panels:
Position one side panel against one side of the folded base: align the straight front edge slightly flush with or just above the 7-row front lip, the flat lower edge along the middle base, and the tall raised section against the 11-row backrest. Secure all corners and along the bottom edge with stitch pins.
Using a single strand of mint cotton yarn and a yarn needle, sew the side panel to the base from the top of the front lip, down along the bottom edge, and up the back edge. Take one stitch per row, and make 2 to 3 reinforcing stitches at every corner and angle so the sleigh holds its shape tightly.
Repeat on the opposite side with the second side panel, then weave in all tails inside the stitches.
Part 4: White Front and Back Borders
Using a single strand of white 2 mm acrylic yarn and the 2.55 mm hook:
Front Lip Border: Join the white yarn at the side edge where the front lip meets the side panel. Work 12 sc evenly across the top edge of the front lip (1 sc into the side corner, 10 sc across the 10 base stitches, and 1 sc into the opposite side corner). Finish with 1 sl st into the side edge, fasten off, and weave the tail cleanly underneath the stitches.
Backrest Border: Join the white yarn at the top corner of the 11-row backrest and work 12 sc evenly across the top edge in the exact same way. Finish with 1 sl st, fasten off, and weave in the ends.
Part 5: Rolled White Side Rails (Make 2)
Using a single strand of white 2 mm acrylic yarn and the 2.55 mm hook:
Foundation: Chain 40.
Rows 1 through 3: Starting in the 2nd chain from the hook, work 39 sc across. For Rows 2 and 3, chain 1, turn, and work 39 sc across. (39 sts per row)
Fasten off, leaving a very long tail for sewing. Weave in the short starting tail.
Folding, Curling, and Attaching Each Rail:
Fold the 3-row white strip in half lengthwise so the foundation chain edge faces up/outward, forming a thick, cushioned rail.
At one end of the strip, count 7 stitches inward and mark with a pin. Using the long yarn tail and a needle, sew the folded edges together along those 7 stitches.
Roll those 7 stitched rows tightly into a small spiral curl (“scroll”) and stitch through the base of the roll a couple of times so it holds its round swirl shape.
Place the white rail along the top edge of one mint side panel, positioning the curled scroll at the high back corner of the sleigh. Pin the folded strip smoothly down the slope and along the top edge to the front corner.
Sew the outer edge of the white rail neatly to the top of the mint side panel using hidden stitches (catching the fabric underneath so the sewing thread stays invisible).
When you reach the front corner of the sleigh, roll the remaining end of the white strip into a matching spiral curl, sew it to hold its swirl shape, and anchor it firmly to the front corner.
Sew the inner edge of the white rail cleanly to the inside of the mint side panel as well, then weave in and trim the remaining yarn tail.
Repeat on the opposite side with the second white rail.
Note: This completes Part 1 of the kawaii crochet sleigh (the finished sleigh basket with cardboard support and white rolled trim). The bottom runners, kawaii face details, and holly berry decoration are covered in Part 2.

See More:

How to Crochet Bell and Holly Leaf Wind Spinner with Pearls

How to Crochet Holly Leaf & Berry Pom Poms Wind Spinner for Holidays

How to Crochet Holly Christmas Coaster with Snowflake Embroidery
Featuring: How to Crochet Holly Leaf on the Hat Gnome Wind Spinner with Tassel

How to Crochet Holly Leaf & Pom Poms White Holiday Treat Sack for Christmas
How to Crochet Holly Leaves & Shiny Beads Perfect Mitten Ornament & Charm for Gifting

How to Crochet Mr. Reindeer Snail Buddy Holding a Treat Basket with Holly Leaves
How to Crochet Festive Birds Amigurumi in Treat Basket & Holly Leaf Decoration
How to Crochet Red-Nose Funny Holly Leaf Decorated Candle Buddy Amigurumi