Author: Talha
I am a crochet designer, macramé maker and a crafter who also loves doing MATH.

Contributor: Elche of Otakulandia Crochet
She is a GREAT crochet designer based in Spain who became our contributor via mycraftybasket!
Show support for Otakulandia!
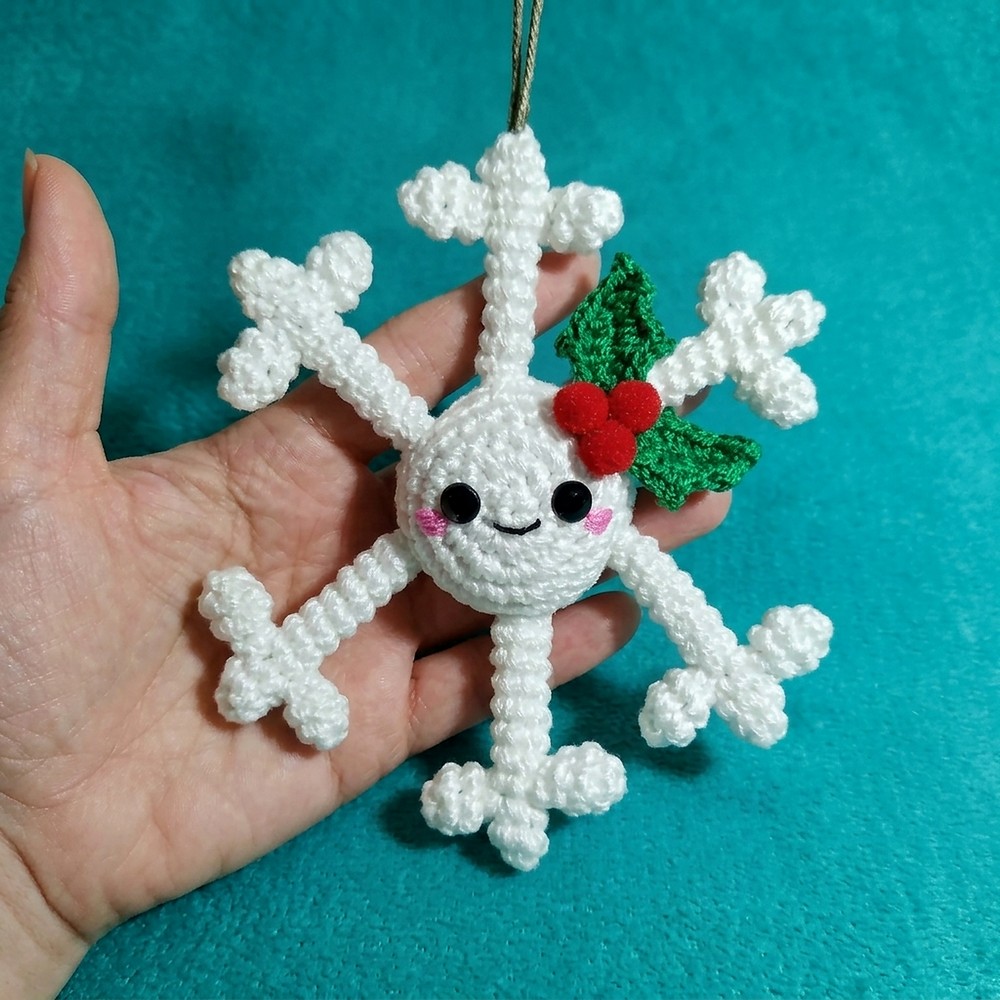
Will you want to crochet a snowflake with a cute, smiling face? Well, last year, I shared tutorials on how to crochet almost all the variations of the traditional snowflake ornaments, from lacy snowflakes to worsted-yarn two-color snowflakes. Since this year, I am more into cute crochet stuff; why not crochet today’s easy crochet amigurumi snowflake buddy together? This is an adorable white stuffed snowflake with a small crochet holy leaf charm and a felt face.
It is practically an easy crochet amigurumi winter decoration, as you just have to learn the middle part pattern and the snowflake point pattern.
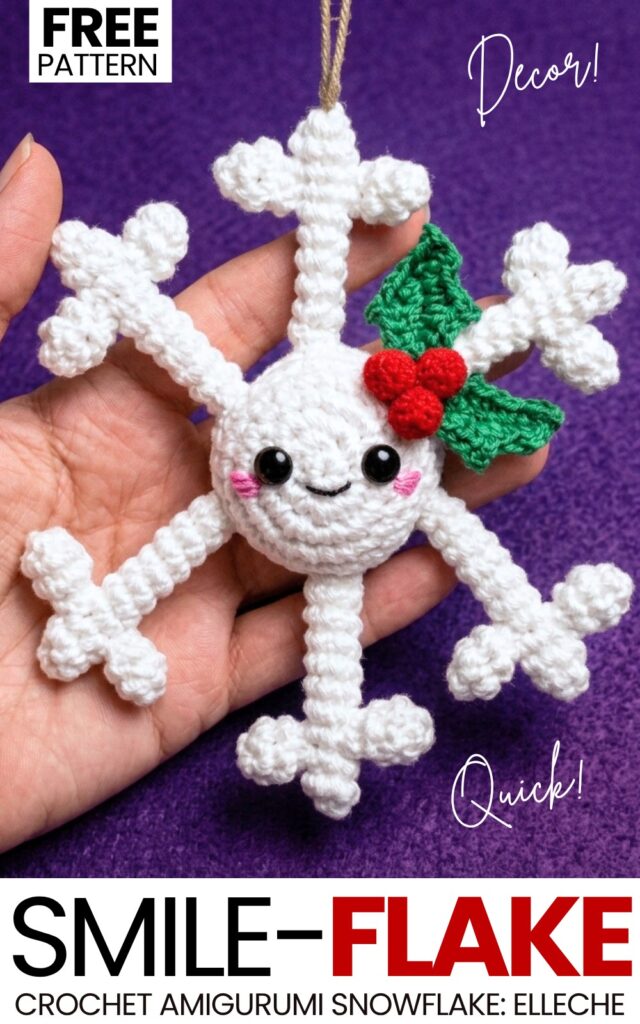
You will end up with a medium-sized amigurumi snowflake, which is perfect for hanging as a Christmas tree ornament as well as decorating the table as a buddy! Now, continue reading to learn more about this crochet amigurumi snowflake project! You will see in the future how to crochet a Christmas boot and many unique snowflake variations as well.
Similar Project(s)
Pattern to Crochet the Smiling Snowflake Amigurumi Decoration
This project is a crochet snowflake toy. You make it with yarn and a hook. First, you make a round middle part. You put soft filling inside it. Then, you make six long arms and twelve short arms. You sew two short arms on each long arm. You sew the six finished arms to the round middle. You put two small black pieces for the eyes. You sew a black mouth and pink cheeks. You can put a string on it to hang it up in the room.
Materials
Cotton Yarn (Size 5): White or light blue. (Note: The video creator holds two strands of yarn together at the same time throughout the whole project to make it thicker and larger).
Crochet Hook: A size appropriate for your double-stranded yarn (e.g., 3.5 mm to 4.5 mm).
Toy Stuffing: Soft fiberfill for the body.
Eyes: Two black safety eyes, flat black beads, or small black buttons.
Embroidery Thread: Black (for the mouth) and Pink (for the cheeks).
Tools: Yarn needle (tapestry needle) for sewing pieces together, scissors, and stitch markers (or pins) to hold pieces in place before sewing.
Abbreviations
MR = Magic Ring
sc = single crochet
inc = increase (make 2 single crochets in the same stitch)
dec = invisible decrease (crochet 2 stitches together to make 1 stitch)
BLO = Back Loop Only (crocheting only in the loop furthest from you)
sl st = slip stitch
st(s) = stitch(es)
Rnd = Round
Are you a Beginner? Learn Crocheting Easily!
You can learn to crochet better with this amigurumi snowflake using the following video tutorial or continue to the pattern:
Detailed Crochet Pattern
1. The Body (Center of the Snowflake)
Work in a continuous spiral. Do not join rounds unless told to.
Rnd 1: Make 7 sc in a Magic Ring. (7 sts)
Rnd 2: Inc in every st around. (14 sts)
Rnd 3: 1 sc, 1 inc. Repeat this around until you reach exactly 20 sts.
Rnd 4: 4 sc, 1 inc. Repeat this around to reach 24 sts.
Rnd 5: 3 sc, 1 inc. Repeat this sequence 6 times. (30 sts)
Rnd 6: Working in BLO (Back Loop Only), make 1 sc in each st around. (30 sts)
Rnd 7: Working in BLO again, make 1 sc in each st around. (30 sts)
Rnd 8: Working in BOTH loops normally, make 1 sc in each st around. (30 sts)
Rnd 9: 3 sc, 1 dec. Repeat this sequence 6 times around. (24 sts)
Rnd 10: 4 sc, 1 dec. Repeat this sequence 4 times around. (20 sts)
Rnd 11: Make 1 dec in every st around. (10 sts)
Finishing the body:
Fasten off and leave a long tail of yarn.
Stuff the inside of the body with soft toy stuffing. Do not overstuff; it needs to be slightly flat.
Thread the yarn tail onto a needle. Weave the needle back and forth through the front loops of the final 10 stitches.
Pull the yarn tight to close the hole.
Press the center flat with your fingers. The front (where you started) should look slightly puffed/bubbly, and the back should look flat.
2. The Long Arms (Make 6)
Rnd 1: Make 6 sc in a Magic Ring. (6 sts)
Rnd 2 to Rnd 10 (9 rounds total): Make 1 sc in each st around. (6 sts per round).
Finishing: After Rnd 10, make a sl st in the next stitch. Fasten off, leaving a long tail for sewing. Do not put stuffing inside the arms.
3. The Short Arms (Make 12)
Rnd 1: Make 6 sc in a Magic Ring. (6 sts)
Rnd 2 to Rnd 3 (2 rounds total): Make 1 sc in each st around. (6 sts per round).
Finishing: After Rnd 3, make a sl st in the next stitch. Fasten off, leaving a long tail for sewing. Do not stuff.
Assembly Instructions
Step 1: Building the Snowflake Rays Take one Long Arm and two Short Arms. Count down to Round 3 of the Long Arm. Pin one Short Arm to the right side between Rnd 3 and Rnd 4, and pin the second Short Arm directly across from it on the left side. Sew them securely to the Long Arm using their yarn tails. This creates a cross shape. Repeat this process until you have 6 completed snowflake rays.
Step 2: Attaching the Rays to the Body Look at the front of the body. You will see a visible ridge of unworked front loops left behind from Rnd 6. You will sew the arms onto this ridge.
Pin the 6 completed arms evenly around the ridge.
The base of each arm is sewn across 2 stitches on the ridge.
Leave exactly 3 empty stitches on the ridge between each arm. (6 arms × 2 sts = 12 sts. Plus 6 gaps × 3 sts = 18 sts. Total = 30 stitches perfectly matched!)
Sew the bottom of each arm securely to the unworked loops. Make sure the front of the cross shape on the arms is facing exactly forward.
Step 3: Making the Face
Eyes: Glue or sew your eyes onto the top half of the snowflake’s flat front. Leave a gap of about one round between them.
Mouth: Using a single strand of black embroidery thread, sew a small, gentle “V” or curved smile slightly below the space between the eyes.
Cheeks: Using a single strand of pink embroidery thread, go to the outer bottom edge of each eye. Make 3 or 4 straight, horizontal stitches overlapping each other to create cute little blush marks on the cheeks.
See More:
How to Crochet A Christmas Tree Bag Charm with Snowflake Embroidery
How to Crochet the Craziest FUNNY Christmas Tree Buddy Amigurumi Ornament
How to Crochet Christmas Yellow Goggle Character Bell Buddy in Santa Hat
![[PDF Pattern] How to Crochet Smiling Snowman Wind Spinner for Christmas](https://criazalblog.com/wp-content/uploads/2026/09/snowman-wind-spinner-224x300.jpg)
[PDF Pattern] How to Crochet Smiling Snowman Wind Spinner for Christmas
![[PDF Pattern] How to Crochet Mr. Cookie Crochet Christmas Gift Basket](https://criazalblog.com/wp-content/uploads/2026/09/crochet-gingerbread-basket-2-223x300.jpg)
[PDF Pattern] How to Crochet Mr. Cookie Crochet Christmas Gift Basket
![[PDF Pattern] How to Crochet A Green Christmas Character Basket in Santa Hat Pattern](https://criazalblog.com/wp-content/uploads/2026/09/crochet-grinch-basket-1-296x300.jpg)
[PDF Pattern] How to Crochet A Green Christmas Character Basket in Santa Hat Pattern

Tester Pattern: To Crochet A Snowball Christmas Dumpling in Basket Plush
PDF Pattern | How to Crochet A Christmas Animal Basket for Gifting
Featuring: Crochet Amuseables Sitting Christmas Tree & Star Are Buddies Plushie