Author: Talha
I am a crochet designer, macramé maker and a crafter who also loves doing MATH.
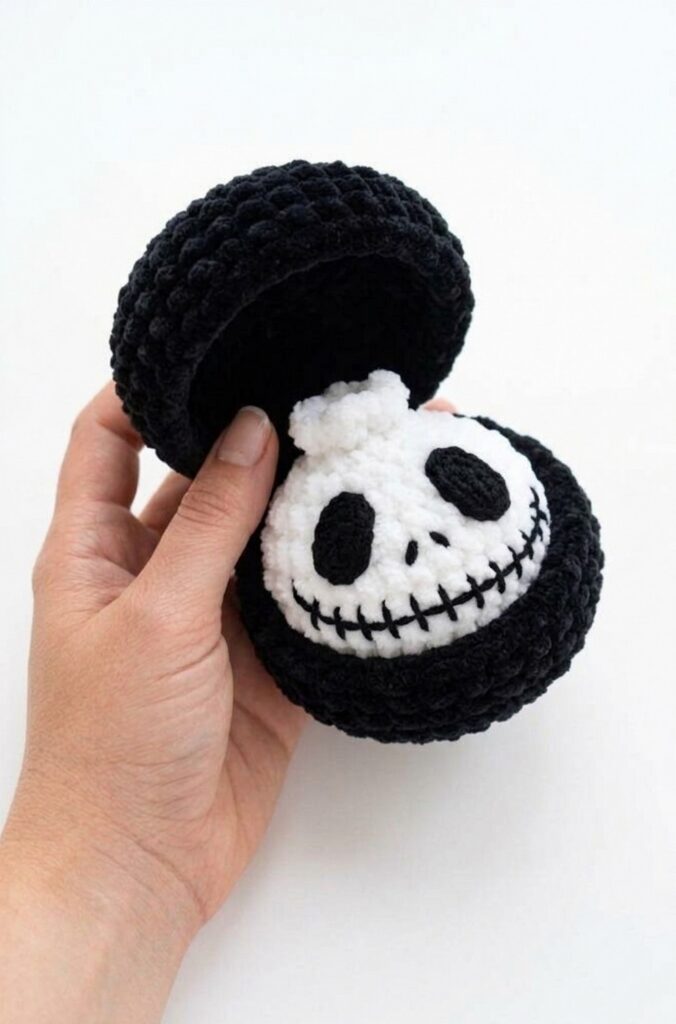
In today’s crochet tester call, learn how to crochet this UNIQUE skeleton face spooky food ball plushie in a black box with a lid. This is part of my “beginner-friendly crochet gifts” series that can be completed in less than 45 minutes.
This time, learn to crochet and make this super-easy white bun plush in a box as a spooky festival gift for a dear one. This time, I wanted to keep it completely crocheted, so the black oval eyes have been used to make the authentic Skellington face.
We also have that spooky stitched mouth. So, with all that said, continue reading to learn more about this crochet plush spooky dumpling plush project for all skill levels!

Similar Project(s)
Pattern to Crochet the Plush Skeleton Gift Plush
Skill Level: Beginner – Level 4
Materials List
White plush yarn (100g / 120m) for the skeleton dumpling.
Black plush yarn (slightly thicker, 100g / 120m) for the box.
Black semi-cotton yarn (like YarnArt Jeans) for the crocheted eyes, skeleton embroidery, and closing the top hole.
4.0 mm crochet hook (for the dumpling and box).
2.0 mm crochet hook (for the eyes).
Toy stuffing (polyfill).
Yarn needle for sewing and embroidery.
Scissors.
Abbreviations
MR = Magic Ring
sc = single crochet
inc = increase
dec = decrease
sl st = slip stitch
ch = chain
BLO / FLO = back loops only / front loops only
R = Round
Skeleton Dumpling Pattern
Hook: 4.0 mm | Yarn: White plush
R1: 8 sc in MR (8).
R2: 8 inc (16).
R3: (1 sc, inc) repeat 8 times (24).
R4: (2 sc, inc) repeat 8 times (32).
R5 to R8 (4 rounds): 32 sc (32).
R9: (2 sc, dec) repeat 8 times (24).
R10: (1 sc, dec) repeat 8 times (16).
Stuff the dumpling gently with toy stuffing so it is soft but holds its shape.
R11: 8 dec (8).
Creating the Top Ruffle:
R12: Working in FLO only, (inc, 1 sc) repeat all the way around. Cut the yarn and finish with a sl st.
Closing the Hole:
Thread black semi-cotton yarn onto your needle. Weave it through the remaining unworked back loops of R11. Pull tightly to close the hole, tie a secure knot, and hide the threads inside the body.
Skeleton Eyes Pattern (Make 2)
Hook: 2.0 mm | Yarn: Black semi-cotton
Foundation: Ch 5.
R1: Turn and work into the second chain from the hook (working into one loop of each chain): inc, sc in each of the next 2 stitches, inc in the last chain.
Rotate: Rotate your piece to continue crocheting along the opposite side of the foundation chain: inc in the end chain, sc in each of the next 2 stitches, inc in the last chain. (Total: 12 stitches).
Fasten off, leaving a long tail for sewing.
Black Box Pattern (Make 2 parts)
Hook: 4.0 mm | Yarn: Black plush
R1: 8 sc in MR (8).
R2: 8 inc (16).
R3: (1 sc, inc) repeat 8 times (24).
R4: (2 sc, inc) repeat 8 times (32).
R5: (7 sc, inc) repeat 4 times (36).
R6: 36 sc in BLO (36).
R7 to R8 (2 rounds): 36 sc (36).
Top Lid: Cut the yarn and weave in the end.
Bottom Base: Do not cut the yarn.
Detailed Assembly & Embroidery
1. Attaching the Eyes & Face Embroidery:
Sewing the Eyes: Using the long yarn tails left on your crocheted eyes, sew them onto the front of the white dumpling between R6 and R9. Angle them slightly outward to match the “crochet skeleton dumpling plush (1).jpg” reference.
The Nose: Thread black semi-cotton yarn. Embroider two tiny, angled vertical slits between the bottom inner corners of the eyes.
The Skeleton Smile: Insert your needle at one far edge of the face and embroider a long, wide curve reaching the other side. Next, stitch 6 to 8 short vertical lines intersecting the main curved line to create the signature stitched teeth. Tie off and hide all ends inside the dumpling.
2. Assembling the Box & Handle:
The Hinge: Align the bottom base and top lid. Crochet sc stitches through the back loop of the lid and the front loop of the base for 5-6 stitches to create a secure hinge. Fasten off and weave in ends.
The Handle: Join black plush yarn to the side of the box (where the lid and base meet). Chain your desired length for the handle. Slip stitch to the opposite side of the box to anchor it. Chain 1, turn, and sc back down each chain stitch. Slip stitch into the starting point, tie off, and hide the ends.