Author: Talha
I am a crochet designer, macramé maker and a crafter who also loves doing MATH.
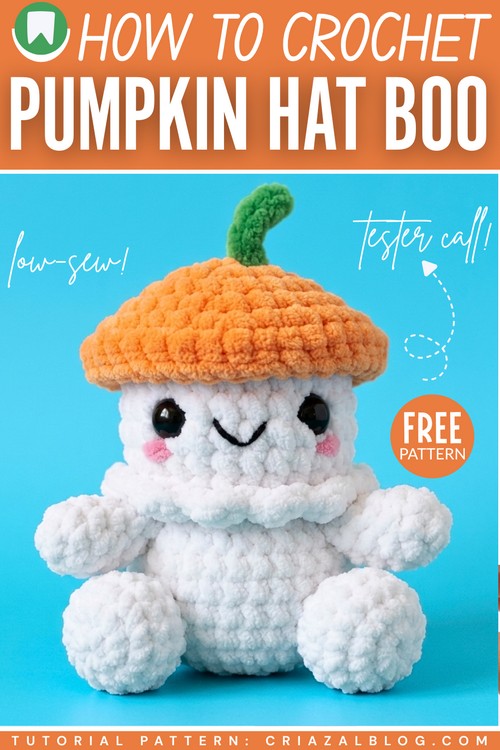
Test my NEW variation of crochet BOO ghost plushie: “the BOO ghost BIG monster plush,” following a FREE pattern. This is my favorite variant of the “ghost in a pumpkin lid hat” plushie. Soon, you will also learn a small no-sew version of this crochet BOO ghost plushie. Crochet it to welcome guests at Halloween in a cheerful way, prepare a bit quirkier Halloween gift for kids, or just because.
Crocheting this plush GHOST MONSTER inspired by BAYMAX will be a lot of fun, as we shall crochet the classic BOO ghost pattern as its head. The body of the monster also just needs the basic stuffed parts such as the sphere, even increases, and more.
This crochet ghost also has the neck ruffle crocheted as the collar of the sitting ghost plush. You can also skip that detail if you want. Note that while I am pretty confident about the correctness of the pattern, because I am looking for pattern testers, be sure to share with me your finished crochet ghost plush!
Similar Project(s)
The Pattern
Materials & Notes
Main Color (A): White
Color (B): Pink
Color (C): Orange
Color (D): Green
Hooks: 7mm hook crochet hook
The Main Ghost Body (White)
Worked in continuous rounds from the top of the head down to the base.
Round 1: Make 6 sc into a Magic Ring. (6 sts)
Round 2: [Inc] repeat 6 times. (12 sts)
Round 3: [1 sc, inc] repeat 6 times. (18 sts)
Round 4: [2 sc, inc] repeat 6 times. (24 sts)
Round 5: [3 sc, inc] repeat 6 times. (30 sts)
Rounds 6-10: Sc in each stitch around. (30 sts for 5 rounds)
Note: Insert safety eyes between Rounds 8 and 9, about 5 stitches apart. Embroider the smile and cheeks now.
Round 11 (The Ruffle): Working in the Front Loops Only (FLO), put 2 hdc in every stitch around. (60 sts). Fasten off the ruffle round here with a slip stitch, but do not cut the main yarn.
Round 12 (The Base): Drop your hook behind the ruffle. Working in the unworked Back Loops Only (BLO) from Round 10, [4 sc, inc] repeat 6 times. (36 sts)
Rounds 13-16: Sc in each stitch around. (36 sts for 4 rounds)
Round 17: [4 sc, dec] repeat 6 times. (30 sts)
Round 18: [3 sc, dec] repeat 6 times. (24 sts)
Start stuffing the body firmly, ensuring the head stays round and the base feels plump.
Round 19: [2 sc, dec] repeat 6 times. (18 sts)
Round 20: [1 sc, dec] repeat 6 times. (12 sts)
Round 21: [Dec] repeat 6 times. (6 sts)
Finish: Fasten off, weave the tail through the front loops of the remaining 6 stitches, pull tight to close the hole, and hide the end inside the body.
Arms (Make 2 – White)
Round 1: Make 6 sc into a Magic Ring. (6 sts)
Rounds 2-4: Sc in each stitch around. (6 sts for 3 rounds)
Finish: Slip stitch to the next stitch. Fasten off, leaving a long tail for sewing. Do not stuff (or stuff very lightly).
Legs (Make 2 – White)
Round 1: Make 6 sc into a Magic Ring. (6 sts)
Round 2: [Inc] repeat 6 times. (12 sts)
Rounds 3-4: Sc in each stitch around. (12 sts for 2 rounds)
Round 5: [Dec] repeat 6 times. (6 sts)
Finish: Slip stitch to the next stitch. Fasten off, leaving a long tail for sewing. Stuff lightly to maintain a chubby, round shape.
The Orange Lid
Worked in continuous rounds. Do not join at the end of rounds unless specified.
Round 1: Using orange yarn, make 6 sc into a Magic Ring. (6 sts)
Round 2: [Inc] repeat 6 times. (12 sts)
Round 3: [1 sc, inc] repeat 6 times. (18 sts)
Round 4: [2 sc, inc] repeat 6 times. (24 sts)
Round 5: [3 sc, inc] repeat 6 times. (30 sts)
Round 6: Sc in each stitch around. (30 sts)
Round 7: Optional flare rim – Slip stitch loosely in each stitch around to create a clean, slightly turned-out edge.
Finish: FO and weave in the ends, leaving a tail if you plan to sew it onto a base, or weave it completely clean if it’s meant to be a removable lid.
The Green Stem
We will work this from the top down.
Row 1: Using green yarn, chain 6.
Row 2: Starting in the second chain from the hook, sc in each of the 5 chains. (5 sts)
Finish: FO leaving a long tail for sewing.
Assembly Instructions
Hat: Sew the Green Stem to the top center of the Orange Lid.
Attach Hat: Using the tail from the Orange Lid (or a fresh strand of orange yarn), sew the lid onto the top of the ghost’s head. It should sit just slightly tipped back, framing the face.
Arms: Flatten the opening of the arms and sew them to the sides of the ghost’s body, right underneath the edge of the ruffle (around Round 12).
Legs: Sew the legs to the front base of the ghost (around Rounds 15-18). Position them pointing slightly outward so the plushie is balanced and can sit upright independently.