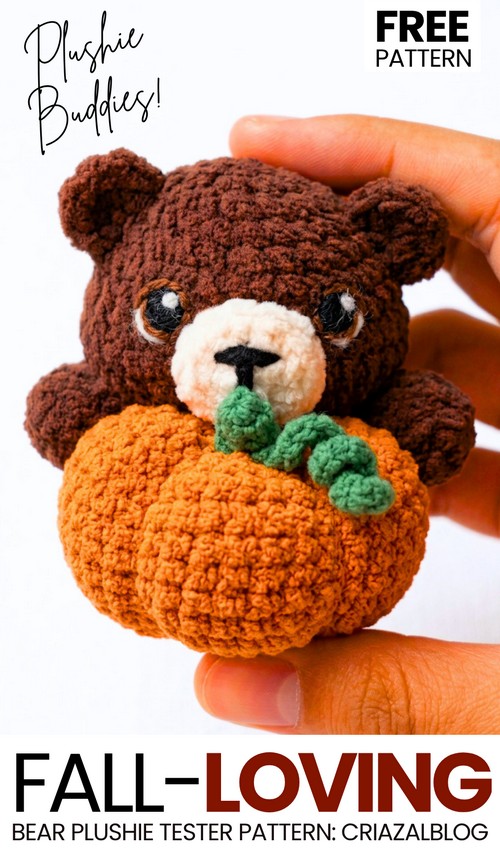
As I promised in the previous tester call, today I am going to share the pattern to crochet my favorite variation of the “crochet fall-loving animal plushies.” And that one is gonna be this oh-so-cute brown bear presenting you with a crochet 9-round pumpkin plushie with curly vines and a bending stem! It is a variation of the crochet Valentine’s Day heart-holding bear plushie, and I am very thankful for such a cute base pattern!
I liked these life-like and detailed eyes more for this crochet grizzly bear pumpkin plush than the black embroidery eyes.
These crochet eyes would also require some black felt and needle embroidery, but it is worth giving a shot. You can also crochet your bear in other colors, such as pink and even purple. Now, continue reading to learn more about this project and the plush grizzly pattern!
Pattern to Fall-Loving Bear Plushie for Halloween
This project makes a small stuffed bear holding a ribbed pumpkin with a stem and curly vine. You will crochet the bear parts (head, body, ears, snout, arms, legs, and tail) and the pumpkin set, then assemble everything into a cute plushie. You need yarn, a crochet hook, fiberfill stuffing, black felt, and embroidery thread for the detailed embroidered eyes and facial features.
Materials & Tools
Yarn: Plush / Worsted weight yarn in Brown (Bear), Orange (Pumpkin), Green (Stem & Vine), and Cream (Snout)
Crochet Hook: 3.5 mm
Stuffing: Fiberfill
Felt & Thread: Black felt circle cutouts, white and black embroidery thread
Notions: Yarn needle, sewing needle, fabric glue (optional), stitch marker, scissors
Abbreviations
MR: Magic Ring
sc: Single crochet
inc: Increase (2 single crochet in the same stitch)
dec: Decrease (single crochet 2 stitches together)
sl st: Slip stitch
st(s): Stitch(es)
[ ]: Total stitch count at the end of the round
Bear Pattern
Head and Body (Worked top-to-bottom in continuous rounds using Brown yarn)
Rnd 1: 6 sc in MR [6]
Rnd 2: inc in each st around [12]
Rnd 3: (1 sc, inc) x 6 [18]
Rnd 4: (2 sc, inc) x 6 [24]
Rnd 5: (3 sc, inc) x 6 [30]
Rnd 6–10: 1 sc in each st around [30] (5 rounds total)
Rnd 11: (3 sc, dec) x 6 [24]
Rnd 12: (2 sc, dec) x 6 [18]
Rnd 13: (1 sc, dec) x 6 [12]
Stuff the head firmly with fiberfill stuffing.
Rnd 14: (1 sc, inc) x 6 [18]
Rnd 15: (2 sc, inc) x 6 [24]
Rnd 16–19: 1 sc in each st around [24] (4 rounds total)
Rnd 20: (2 sc, dec) x 6 [18]
Stuff the body firmly with fiberfill stuffing.
Rnd 21: (1 sc, dec) x 6 [12]
Rnd 22: dec x 6 [6]
Fasten off, leaving a short yarn tail. Thread the tail through the front loops of the remaining 6 stitches, pull tight to close the hole, and weave in the end inside the body.

Ears (Make 2) (Worked in continuous rounds using Brown yarn)
Rnd 1: 6 sc in MR [6]
Rnd 2: (1 sc, inc) x 3 [9]
Rnd 3: 1 sc in each st around [9]
Fasten off, leaving a long tail for sewing. Do not stuff. Press flat.
Snout (Worked in continuous rounds using Cream yarn)
Rnd 1: 6 sc in MR [6]
Rnd 2: inc in each st around [12]
Rnd 3: 1 sc in each st around [12]
sl st into the next stitch. Fasten off, leaving a long tail for sewing. Using black embroidery thread, sew an upside-down triangle nose and a short vertical line down for the mouth.
Arms (Make 2) (Worked in continuous rounds using Brown yarn)
Rnd 1: 5 sc in MR [5]
Rnd 2: inc in each st around [10]
Rnd 3–4: 1 sc in each st around [10] (2 rounds total)
Rnd 5: (3 sc, dec) x 2 [8]
Rnd 6–7: 1 sc in each st around [8] (2 rounds total)
Stuff the bottom half lightly. Press top opening flat and work 4 sc across to close. Fasten off, leaving a long tail for sewing.
Pumpkin & Accessories Pattern
Pumpkin (9 Rounds) (Worked in joined rounds using Orange yarn)
Rnd 1: 6 sc in MR [6]
Rnd 2: inc in each st around [12]
Rnd 3: (1 sc, inc) x 6 [18]
Rnd 4: (2 sc, inc) x 6 [24]
Rnd 5–6: 1 sc in each st around [24] (2 rounds total)
Rnd 7: (2 sc, dec) x 6 [18]
Rnd 8: (1 sc, dec) x 6 [12] (Stuff firmly with fiberfill)
Rnd 9: dec x 6 [6]
Fasten off, leaving a long tail (20 inches) for shaping the ribs. Thread tail through front loops of remaining 6 stitches to close.
Shaping Pumpkin Ribs:
Thread the long orange yarn tail onto a yarn needle.
Pass the needle through the bottom center hole up through the top center hole. Pull tightly to indent the center.
Bring yarn around the outside wall and pass through bottom-to-top again. Pull firmly to form a rib section.
Repeat 5–6 times around the pumpkin to create even sections, then knot securely at the base.
Stem (Worked in continuous rounds using Green yarn)
Rnd 1: 5 sc in MR [5]
Rnd 2–3: 1 sc in each st around [5] (2 rounds total)
sl st into the next stitch. Fasten off, leaving a long tail for sewing. Do not stuff.
Curly Vine (Worked using Green yarn)
Row 1: Chain 10-15 [10-15]
Row 2: Starting in the 2nd chain from the hook, work 3 sc into each chain stitch across [27]
Fasten off, leaving a long tail for sewing.
Felt & Embroidered Eyes Guide
Step 1: Cut Felt Base: Cut two 8–10 mm round circles from black felt.
Step 2: Position Eyes: Glue or pin the felt circles between Rnd 8 and Rnd 9 on the head, spaced 5–6 stitches apart.
Step 3: Secure Felt: Use a sewing needle and black embroidery thread to stitch tiny border stitches around each circle.
Step 4: Add Highlights: Using white thread, embroider a curved outline along the outer edge of each eye. Add a bright white stitch at the top right corner and a tiny accent dot on the opposite bottom corner for shine.
Full Assembly Instructions
Snout & Face: Center the completed snout between Rnd 7 and Rnd 11, placing it right between the eyes. Sew securely.
Ears: Sew ears onto Rnd 4–6 on top of the head, evenly spaced.
Pumpkin Details: Sew the green stem onto the top center of the pumpkin. Sew the curly vine right beside the stem.
Bear & Pumpkin Setup: Place the finished pumpkin against the lower front of the bear’s body.
Arms & Legs: Sew the legs onto the bottom sides of the bear body (Rnd 18–20) so the bear sits flush. Position the arms on the sides (Rnd 14) so they reach forward to hug the pumpkin; stitch the hands to the pumpkin surface.
Tail: Sew the tail onto the lower center back (Rnd 18–19) to balance the sitting posture. Weave in all loose yarn ends.
See More:

Crochet CUTEST Guest-Welcoming BOO Ghost with Bow, Hat and Pumpkin Accessories

Tester Call: How to Crochet A Candy Corn, Pumpkin & Kawii Buddy Potted Plant Plushie

Featuring: How to Crochet the Smallest Pumpkin Fall Turtle Plushie with Orange & Parrot

Pattern Tester: How to Crochet Pumpkin Ridges Face Donut Ring Plushie for Fall

How to Crochet An Amigurumi Long-Legged Kawaii Pumpkin in Shoes Buddy

How to Granny Square with Pumpkin Applique in the Middle

Tester Pattern: To Crochet Pumpkin Hello Kitty Plushie with Big Paws Buddy

Featuring: How to Crochet Tiered Unusual Texture Pumpkin Decoration (3 Sizes)

Tester Pattern: To Crochet A Witch Cat Plush Gifting You A Pumpkin Softie