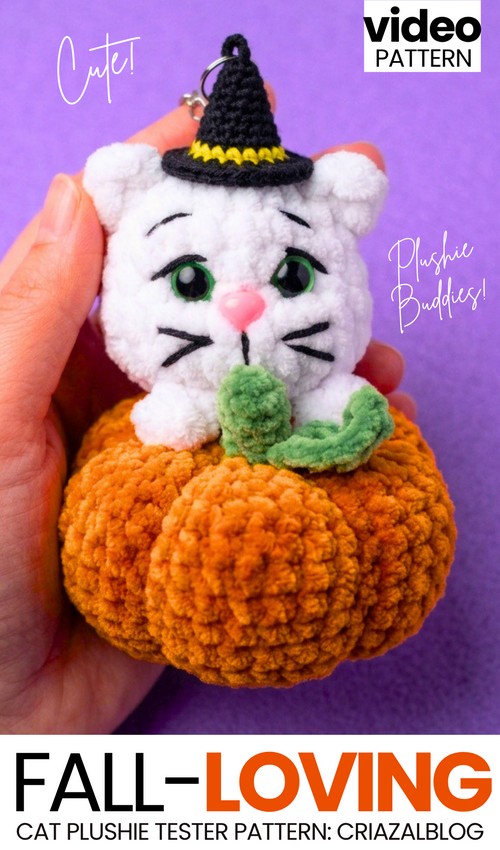
Welcome to another tester call of the “crochet pumpkin-loving witch animals” series! Today, I have chosen our white Valentine’s Day crochet cat plush as our pumpkin-loving animal that you will soon learn in the crochet collaborative patterns category. Today, learn how to crochet an oh-so-cute white cat gifting you a pumpkin plushie with a complete written pattern.
This crochet plush pumpkin and cat make an irresistibly cute table buddy and a welcome decoration for guests.
The crochet pumpkin requires only 12 rounds and includes a basic leaf. I have kept the stem attached to the plush so it looks like the cat is giving you the pumpkin instead of the classic “cat stuck in a pumpkin” amigurumi idea. Soon, I am also planning to bring my favorite, a crochet plush pumpkin bear! So, be sure to stay updated!
[ez-toc]
Pattern to Crochet the Plush Fall-Loving Pumpkin
Today, you are going to crochet a plush cat in a pumpkin! You make it with soft yarn and a hook. You make the pumpkin first. You make the head next. You sew the head to the top of the pumpkin. The cat has two small paws on the front of the pumpkin. You sew a witch hat to the head and put a ring on it to make it a keychain. It is a very easy pattern to make and it looks very cute.
Materials Needed
Plush Yarn (100g / 120m thickness, like Himalaya Dolphin Baby or YarnArt Dolce):
Cat Color (White, Gray, or color of choice)
Pumpkin Color (Orange)
Stem/Vine Color (Green)
Hat Colors (Purple and Yellow) Crochet Hook: 4.0 mm Safety Eyes: 10 mm size Small Plastic Nose (to glue on) or pink thread to embroider one Thin Black Thread (for eyelashes, eyebrows, and whiskers) Strong Cotton Yarn (for sewing pieces together and sculpting the face and pumpkin) Fiberfill StuffingKeychain CarabinerTools: Stitch marker, yarn needle, and scissors
Pattern Abbreviations (US Terms)
MR: Magic ring
ch: Chain
sc: Single crochet
hdc: Half double crochet
dc: Double crochet
inc: Increase (2 sc in the same stitch)
dec: Decrease (sc 2 stitches together)
st(s): Stitch(es)
sl st: Slip stitch
F.O.: Fasten off
Paw Stitch (3-DC Bobble): 3 double crochets worked into the same stitch and closed together with a single shared loop at the top.
Detailed Step-by-Step Pattern
1. The Pumpkin
Round 1: Using the Pumpkin Color (Orange), make a MR and work 6 sc into it. (6 sts)
Round 2: 6 inc. (12 sts)
Round 3: (1 sc, 1 inc) x 6. (18 sts)
Round 4: (2 sc, 1 inc) x 6. (24 sts)
Round 5: (3 sc, 1 inc) x 6. (30 sts)
Rounds 6–9: Work 30 sc around (for 4 rounds). (30 sts)
Round 10: (3 sc, 1 dec) x 6. (24 sts)
Round 11: (2 sc, 1 dec) x 6. (18 sts)
Stuff the pumpkin firmly with fiberfill.
Round 12: (1 sc, 1 dec) x 6. (12 sts)
Fasten off, leaving a very long tail. Weave the tail through the front loops to close the hole.
Pumpkin Sculpting: Thread your strong cotton yarn or the long orange tail onto your needle. Push the needle straight through the center bottom to the top center, pulling tightly over the outside of the pumpkin to create a ridge. Repeat this process 5 to 6 times, spacing the lines evenly around the pumpkin to create the segments. Tie off securely.

2. The Stem and Vine
Stem (Green):
Round 1: Make a MR and work 4 sc into it. (4 sts)
Rounds 2–3: Work 4 sc around (for 2 rounds). (4 sts)
Fasten off, leaving a tail for sewing.
Vine (Green):
Chain 12.
Starting in the second chain from the hook, work 2 sc into every chain across. (This will make it curl automatically).
Fasten off, leaving a tail for sewing.
Leaf Pattern (used here!)
Round/Row 1: Using the Leaf/Stem Color (Green), chain 6.
Row 2: Starting in the second chain from the hook, work: 1 sc, 1 hdc, 1 dc, 1 hdc, and 3 sc into the very last chain.
Now, working down the opposite side of the starting chain chain-space: work 1 hdc, 1 dc, 1 hdc, 1 sc, and finish with a slip stitch into the very first stitch to close the leaf shape.
Fasten off, leaving a long tail for sewing the leaf next to the stem on top of the pumpkin.
3. The Cat Head
Round 1: Using the Cat Color, make a MR and work 6 sc into it. (6 sts)
Round 2: 6 inc. (12 sts)
Round 3: (1 sc, 1 inc) x 6. (18 sts)
Rounds 4–5: Work 18 sc around (for 2 rounds). (18 sts)
Round 6: (2 sc, 1 inc) x 6. (24 sts)
Rounds 7–8: Work 24 sc around (for 2 rounds). (24 sts)
Round 9: (2 sc, 1 dec) x 6. (18 sts)
Insert the 10 mm safety eyes between Rounds 5 and 6, leaving a gap of about 4 stitches between them. Stuff the head with fiberfill.
Round 10: 9 dec. (9 sts)
Fasten off, leaving a tail. Weave the tail through the front loops to close the hole at the bottom of the head.
Face Sculpting (Eye Indentations): Thread a needle with strong cotton yarn. Insert it into the bottom hole of the head and pull it out right next to the outer edge of the left eye. Insert it back in next to the inner edge of the same eye and push it straight out the bottom of the head. Pull the two ends tightly to sink the eye into the face, and tie a knot at the bottom. Repeat this exact process for the right eye.
4. The Ears: The ears are crocheted directly onto the finished head.
Find a spot on the upper side of the head for the first ear.
Insert your hook into a stitch, attach your Cat Color yarn, and pull up a loop.
In the exact same stitch, work: 1 hdc, 1 dc, and 1 hdc.
Slip stitch back into the same space to anchor it.
Fasten off, cut the yarn, and hide the tails inside the head.
Repeat on the other side of the head to make the second ear.
5. The Paws (Make 2)
Using the Cat Color, ch 2.
Work 1 Paw Stitch (3-DC Bobble) into the second chain from the hook.
Fasten off, leaving a tail for sewing.
6. The Witch Hat
Round 1 (Purple): Magic ring, 4 sc, sl st to join [4]
Round 2: ch 1, (1 sc, inc) x 2, sl st [6]
Round 3: ch 1, (2 sc, inc) x 2, sl st [8]
Round 4: ch 1, (3 sc, inc) x 2, sl st [10]
Round 5: ch 1, (4 sc, inc) x 2, sl st [12]
Round 6: ch 1, (5 sc, inc) x 2, sl st [14]
Round 7 (Switch to Yellow): ch 1, 14 sc around, sl st [14]
Round 8 (Switch to Purple): ch 1, inc with hdc in every stitch (2 hdc in each st), sl st around the rim [28]
F.O.: Cut yarn and weave in ends, leaving a long tail of purple yarn if you wish to sew it directly to the head. Lightly stuff the tip of the hat if needed.
7. Details and Assembly
Face: Glue the small plastic nose between the eyes. Use the thin black thread to embroider a straight line down from the nose. Embroider a few small whiskers on the cheeks, short eyelashes at the corners of the eyes, and tiny eyebrows higher up.
Pumpkin Top: Sew the green stem securely to the top center of the pumpkin. Sew the curly vine right next to the base of the stem.
Attaching to the Pumpkin: Place the finished head just behind the stem. Position it so the cat looks like it is standing behind the pumpkin. Use your strong cotton yarn to sew the bottom back of the head firmly to the top indent of the pumpkin.
Paws: Sew the two small paws to the front upper edge of the pumpkin, spaced slightly apart, so it looks like the cat is resting its paws on the fruit.
Hat & Keychain: Position the witch hat slightly askew on top of the cat’s head, between the ears, and sew it firmly in place. Attach your keychain carabiner to the very tip of the hat.