Author: Talha
I am a crochet designer, macramé maker and a crafter who also loves doing MATH.
In the 2-round heart tutorial, I promised to teach you how to customize that basic heart into something even more beautiful. I had three options: either make a third round (coaster), add a picot border, or turn it into a square.
Of these, I have chosen the solid heart granny square, as this is the most versatile way to use your basic heart. You can turn it into an AirPod pouch, sweater, placemat, and even bags.
So, in this tutorial, I will teach you how to crochet the popular heart granny square in black and pink. These colors look so cute, but you can also choose the popular white and pink.
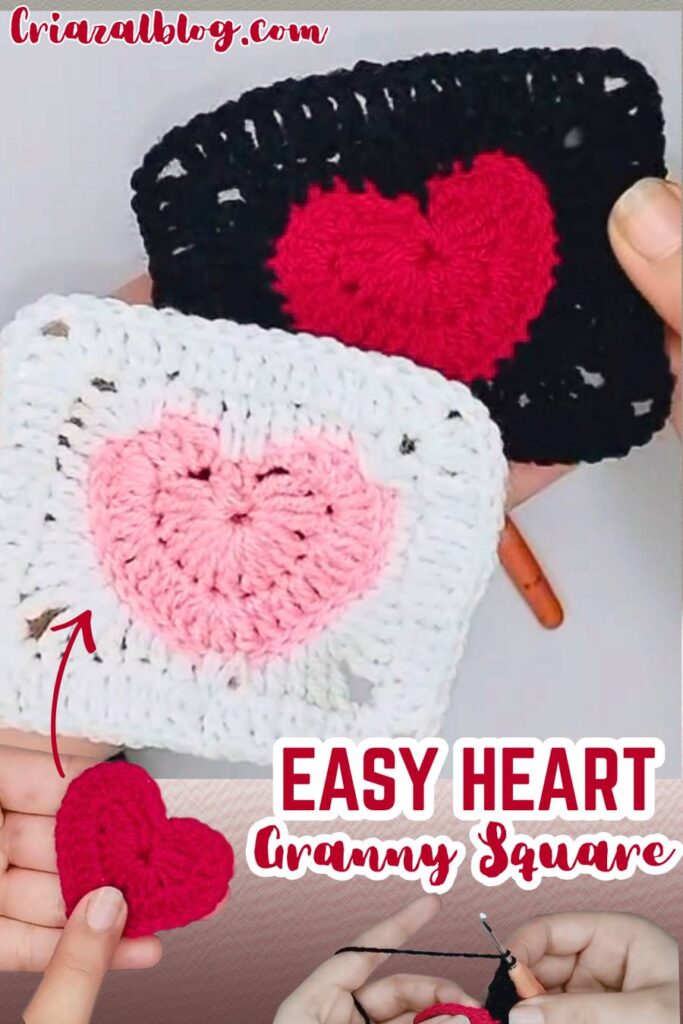
How I Crocheted Heart Granny Square
Crocheting a solid granny square with a heart centre basically needs making corners, sides, and working the solid granny square pattern. Here is how I did that:
- I used my two-round crochet heart with 29 + 1 chain stitches.
- I began by attaching the new yarn to the stitch at the tip of the heart.
- Hereafter, working some stitches of three heights, made my first corner.
- Then crocheted the complete left side and made the 2nd corner.
- For the top centre of the heart, I worked the spiked double crochet that is also called long dc.
- We also need a chain space for the corners.
Crochet Heart Granny Square Pattern
Project Difficulty: Easy
Recommended Materials
To crochet this heart granny square, you will need yarn in two colors.
- I used a 2.5mm crochet hook
- Black and Dark Pink DK cotton yarn
- You can also use the Milk Cotton yarn
Review the Stitches and Abbreviations
MR: Magic Ring
ch: Chain
sl st: Slip Stitch
sc: Single Crochet
hdc: Half Double Crochet
dc: Double Crochet
tr: Treble Crochet
st(s): Stitch(es)
sp: Space
- dtr: double treble
Instructions
R1 Right Side:
- Ch 4. Inserting the hook in the ring: work 4 dc, 2 tr. Ch 4, sl st into the ring.
R1 Left Side:
- Ch 4. Make 2 tr, 4 dc in the magic ring.
- sl st.
R2 Right Side:
- Ch 4.
- 1 dc in the same st as join (the top of the beg ch-4 from R1).
- 2 dc in the next 3 sts.
- Work (1 dc, 1 tr) in the next st.
- 2 tr in the next st.
- 3 tr in the next st.
- 1 dc in the top of the ch-4 loop from R1 (the chain going down to the center).
- Ch 4, sl st into the center ring of the heart.
- R2 Left Side: Ch 4.
- 1 dc in the top of the ch-4 loop from R1 (the chain coming up from the center).
- 3 tr in the next st.
- 2 tr in the next st.
- Work (1 tr, 1 dc) in the next st.
- 2 dc in the next 2 sts.
- Work (1 dc, 1 tr) in the last st.
- sl st.
- Weave in ends.
R1 Right Side:
- Ch 4. Insert the hook into the ring: work 4 tr, 2 dtr.
- Ch 4, sl st into the ring.
- R1 Left Side:
- Ch 4. Insert hook into the ring: 2 dtr, 4 tr.
- Make a sl st to join.
R3 – The Solid Granny Border
The following pattern will work even when you make the crochet heart by making a basic circle for R1. Just make sure you have 30 stitches in the R2, counting turning chains as the stitch.
I will attach the color B to the stitch at the bottom of the heart.
First work 1 sc in the same stitch. Then make 1 sc in the next stitch, 1 hdc in the next stitch, and 1 dc in the next stitch.
This completes half of the bottom of the heart border.
Corner 1: (2 tr, ch 2, 2 tr) in the next st. From now on, we can work the full right side.
Side 1: 2 dc in next st, 1 hdc in next st, 1 sc in each of the next 4 sts. The pattern works because the heart has more height from the bottom, which decreases as you go upward.
Corner 2: (2 hdc, ch 2, 2 hdc) in the next st.
Top Side: 1 hdc in each of the next 2 sts, 1 dc in next st, 1 dc into the center of the sc from Round 2 (spike st/long dc into the dip), 1 dc in next st, 1 hdc in each of the next 2 sts.
Corner 3: (2 hdc, ch 2, 2 hdc) in the next st.
Side 3: 1 sc in each of the next 4 sts, 1 hdc in next st, 2 dc in next st.
Corner 4: (2 tr, ch 2, 2 tr) in the next st.
Bottom Side (End): 1 dc in next st, 1 hdc in next st, 1 sc in the last st.
Join with a sl st into the first sc.
Note: You should now have 11 sts on each side between the ch-2 corner spaces.
Round 4 (Border)
Ch 2 (counts as first dc).
Dc in each st until you reach the corner space.
Corner: (2 dc, ch 2, 2 dc) in the ch-2 sp.
Sides: Dc in each of the 11 sts across the side.
Repeat the Corner and Side instructions around the square.
When you make the last side, dc in the remaining 5 sts.
Join with a sl st to the top of the beginning ch 2.
Note: You should now have 15 sts on each side between the corners.
Pattern for Print
Crochet Heart Granny Square Pattern

Crochet the popular heart granny square in black and pink. These colors look so cute, but you can also choose the popular white and pink.
- 2.5mm crochet hook
- DK Black and Pink Cotton Yarn
R1 Right Side:
- Ch 4. Inserting the hook in the ring: work 4 dc, 2 tr. Ch 4, sl st into the ring.
- R1 Left Side:
- Ch 4. Make 2 tr, 4 dc in the magic ring.
- sl st.
R2 Right Side:
- Ch 4.
- 1 dc in the same st as join (the top of the beg ch-4 from R1).
- 2 dc in the next 3 sts.
- Work (1 dc, 1 tr) in the next st.
- 2 tr in the next st.
- 3 tr in the next st.
- 1 dc in the top of the ch-4 loop from R1 (the chain going down to the center).
- Ch 4, sl st into the center ring of the heart.
R2 Left Side: Ch 4.
- 1 dc in the top of the ch-4 loop from R1 (the chain coming up from the center).
- 3 tr in the next st.
- 2 tr in the next st.
- Work (1 tr, 1 dc) in the next st.
- 2 dc in the next 2 sts.
- Work (1 dc, 1 tr) in the last st.
- sl st.
- Weave in ends.
R1 Right Side:
- Ch 4. Insert the hook into the ring: work 4 tr, 2 dtr.
- Ch 4, sl st into the ring.
- R1 Left Side:
- Ch 4. Insert hook into the ring: 2 dtr, 4 tr.
- Make a sl st to join.
R3 – The Solid Granny Border
- The following pattern will work even when you make the crochet heart by making a basic circle for R1. Just make sure you have 30 stitches in the R2, counting turning chains as the stitch.
- I will attach the color B to the stitch at the bottom of the heart.
- First work 1 sc in the same stitch. Then make 1 sc in the next stitch, 1 hdc in the next stitch, and 1 dc in the next stitch.
- This completes half of the bottom of the heart border.
Corner 1: (2 tr, ch 2, 2 tr) in the next st. From now on, we can work the full right side.
- Side 1: 2 dc in next st, 1 hdc in next st, 1 sc in each of the next 4 sts. The pattern works because the heart has more height from the bottom, which decreases as you go upward.
- Corner 2: (2 hdc, ch 2, 2 hdc) in the next st.
- Top Side: 1 hdc in each of the next 2 sts, 1 dc in next st, 1 dc into the center of the sc from Round 2 (spike st/long dc into the dip), 1 dc in next st, 1 hdc in each of the next 2 sts.
- Corner 3: (2 hdc, ch 2, 2 hdc) in the next st.
- Side 3: 1 sc in each of the next 4 sts, 1 hdc in next st, 2 dc in next st.
- Corner 4: (2 tr, ch 2, 2 tr) in the next st.
- Bottom Side (End): 1 dc in next st, 1 hdc in next st, 1 sc in the last st.
- Join with a sl st into the first sc.
- Note: You should now have 11 sts on each side between the ch-2 corner spaces.
- Round 4 (Border)
- Ch 2 (counts as first dc).
- Dc in each st until you reach the corner space.
- Corner: (2 dc, ch 2, 2 dc) in the ch-2 sp.
- Sides: Dc in each of the 11 sts across the side.
- Repeat the Corner and Side instructions around the square.
- When you make the last side, dc in the remaining 5 sts.
- Join with a sl st to the top of the beginning ch 2.
- Note: You should now have 15 sts on each side between the corners.