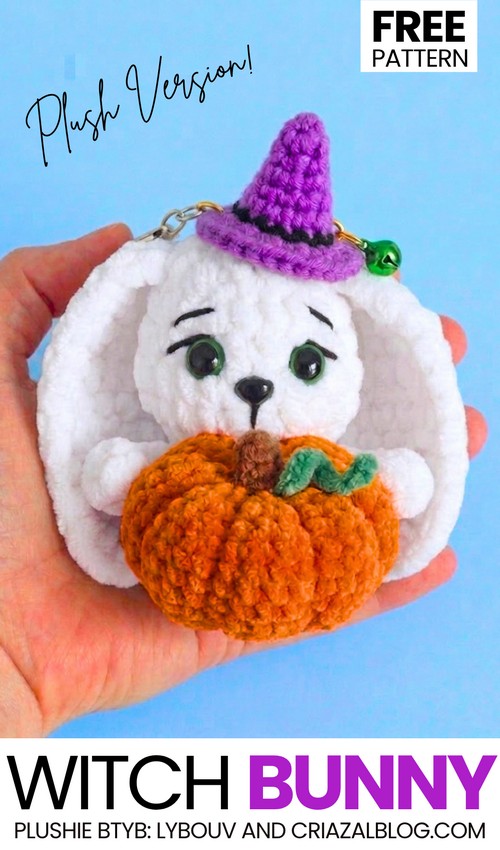
Today’s crochet Halloween tester pattern is inspired by the “crochet pumpkin-loving animal plushie” you learned in this week’s featured tutorial. Today, learn to crochet this witch bunny plushie holding a pumpkin plush present instead with a step-by-step tutorial for beginners. I have used the crochet long-ear bunny face as the base.
Since the crochet pumpkin was bigger, instead of crocheting the arms directly onto the pumpkin using bobble stitch, I have written a proper crochet plush arm pattern below.
Test this crochet plush pattern and be sure to share your finished creations with me. You can also use the crochet pumpkin plushie pattern of this bunny as a keychain or a fall decoration. Now, continue readingf or learning more about this crochet plush pumpkin and bunny project as well as the full pattern to crochet one!
[ez-toc]
Pattern to Crochet the Plush Witch Bunny Holding A Pumpkin Plush
This project is a small plush bunny holding an orange pumpkin. You make it using soft plush yarn and a crochet hook. The bunny has two small paws on the sides of the pumpkin so it looks like it is hugging it. The head and long ears sit on top of the pumpkin, and it wears a small witch hat. When finished, the toy is about 11 centimeters tall. You can add a clip at the top to make it a keychain for a bag or keys.
Materials Needed
Plush Yarn (100 g / 120 m density, such as Himalaya Dolphin Baby or YarnArt Dolce):
White / Bunny Color (for the head, ears, and paws)
Orange (for the pumpkin body)
Purple and Black (for the witch hat)
Small scraps of Brown and Green (for the pumpkin stem and vine)
Crochet Hooks:
4.0 mm hook (for the pumpkin body, head, arms, and hat)
5.0 mm hook (for the ears)
Safety Eyes: 10 mm size (1 pair)
Safety Nose: Small plastic triangle nose (or black/pink thread to embroider)
Black Embroidery Thread: For eyelashes, eyebrows, and nose line
Sewing Thread: Cotton or semi-cotton yarn to sew the head and parts together
Accessories: Keychain Ring or Carabiner Clip, small green craft bell
Filling: Fiberfill Stuffing
Tools: Yarn needle, stitch marker, sewing pins, and scissors
Pattern Abbreviations (US Terms)
MR: Magic Ring / Magic Circle
ch: Chain
sc: Single Crochet
hdc: Half Double Crochet
inc: Increase (2 sc in the same stitch)
dec: Decrease (sc 2 stitches together)
hdc inc: Half Double Crochet Increase (2 hdc in the same stitch)
hdc dec: Half Double Crochet Decrease (hdc 2 stitches together)
st(s): Stitch(es)
1. Witch Hat (4.0 mm Hook)
Worked from the top down.
R1 (Purple): Magic ring, 4 sc, sl st to join. [4 sts]
R2: ch 1, (1 sc, inc) x 2, sl st. [6 sts]
R3: ch 1, (2 sc, inc) x 2, sl st. [8 sts]
R4: ch 1, (3 sc, inc) x 2, sl st. [10 sts]
R5: ch 1, (4 sc, inc) x 2, sl st. [12 sts]
R6: ch 1, (5 sc, inc) x 2, sl st. [14 sts]
R7 (Switch to Black): ch 1, 14 sc around, sl st. [14 sts]
R8 (Switch to Purple): ch 1, inc with hdc in every stitch (2 hdc in each st), sl st around the rim. [28 sts]
F.O.: Cut yarn and weave in ends.
2. Bunny Ears (Make 2, 5.0 mm Hook)
The ears are worked in turned rows using bunny yarn (White) and the larger 5.0 mm hook.
Row 1: Ch 3. Starting in the 2nd ch from hook, work 1 hdc, then 1 hdc in the next ch. Ch 1, turn. (2 hdc)
Row 2: Work 2 hdc inc (2 hdc in each st). Ch 1, turn. (4 hdc)
Row 3: 4 hdc. Ch 1, turn. (4 hdc)
Row 4: 4 hdc. Ch 1, turn. (4 hdc)
Row 5: 4 hdc. Ch 1, turn. (4 hdc)
Row 6: 4 hdc. Ch 1, turn. (4 hdc)
Row 7: Work 2 hdc dec across the 4 sts. Ch 1, turn. (2 hdc)
Row 8: 2 hdc. (2 hdc)
Border: Ch 1, work sc evenly all around the outer edge of the ear to smooth out the sides. Make an increase (2 sc) at the bottom corners so the bottom edge stays rounded and flat.
Fasten off.
3. Head (4.0 mm Hook)
Worked from the bottom up in bunny yarn (White).
Round 1: In a MR, work 6 sc. (6 sts)
Round 2: (1 sc, 1 inc) x 3. (9 sts)
Round 3: 9 inc. (18 sts)
Round 4: (2 sc, 1 inc) x 6. (24 sts)
Rounds 5–6: 24 sc around (2 rounds total). (24 sts)
Round 7: (2 sc, 1 dec) x 6. (18 sts)
Round 8: 18 sc around. (18 sts)
Note: Insert 10 mm safety eyes between Rounds 6 and 7, centered on the front about 4 to 5 stitches apart.
Round 9 (Crocheting in the Ears): (1 sc, 1 dec) x 6. (12 sts) Hold each ear to the side of the head aligned with the eyes. Work through both the ear edge and head stitches together across 3 stitches for each ear.
Note: Stuff the head firmly with fiberfill.
Round 10: 6 dec. (6 sts)
Fasten off, weave the yarn through the front loops of the remaining 6 stitches, pull tight to close, and hide the end.
4. Arms (Make 2, 4.0 mm Hook)
Worked in bunny yarn (White).
Round 1: 5 sc in a magic ring. (4 sts)
Round 2: [sc, inc] * 2. (6 sts)
Rounds 3–6: sc in each stitch across (4 rounds total). (6 sts)
Fasten off, leaving a tail for sewing. Stuff lightly if desired, or leave flat.
5. Pumpkin (4.0 mm Hook)
Worked in Orange yarn to create a sphere, then shaped into a pumpkin.
Round 1: In a MR, work 6 sc. (6 sts)
Round 2: 6 inc. (12 sts)
Round 3: (1 sc, 1 inc) x 6. (18 sts)
Round 4: (2 sc, 1 inc) x 6. (24 sts)
Round 5: (3 sc, 1 inc) x 6. (30 sts)
Rounds 6–9: 30 sc around (4 rounds total). (30 sts)
Round 10: (3 sc, 1 dec) x 6. (24 sts)
Round 11: (2 sc, 1 dec) x 6. (18 sts)
Note: Stuff the sphere firmly with fiberfill here.
Round 12: (1 sc, 1 dec) x 6. (12 sts)
Fasten off, leaving a very long tail for shaping.
Shaping the Pumpkin (Standard Method): Thread the long orange tail onto your yarn needle. Insert the needle straight through the center hole at the top of the pumpkin and pull it out through the bottom center hole (the magic ring). Wrap the yarn tightly around the outside of the sphere back to the top. Repeat this process 5 to 6 times, spacing the wraps evenly around the sphere to create the segmented indentations of a pumpkin. Pull tightly each time to define the shape. Tie off and hide the yarn tail.
Vine:
Ch 8 – 9.
Work 2sc in each stitch across!
Stem:
R1: 4sc in a magic ring!
Round 2: [sc, inc] * 2. (6 sts)
Rounds 3-4: sc in each stitch across (2 rounds total). (6 sts)
Round 5: In BLO, sc in each stitch across!
6. Assembly & Facial Details
Facial Features:
Attach or glue the small plastic nose between the eyes (or embroider it with pink thread).
Embroider a vertical line going down from the nose using black thread.
Embroider small eyelashes next to the safety eyes and short eyebrows above them.
Attaching Head to Pumpkin:
Place the head in the top back depression of the pumpkin so the bunny appears to hold the pumpkin with its paws.
Pin the head in place and sew the lower back of the head securely to the pumpkin using strong cotton yarn.
Attaching Arms and Hat:
Attach the arms to the back/sides of the pumpkin, pulling them slightly forward so the bunny is hugging it.
Embroider or sew a small brown stem and green curled vine to the top center of the pumpkin just in front of the bunny’s chin.
Sew the witch hat slightly offset on top of the bunny’s head.
Keychain Loop:
Attach the metal carabiner or keychain ring securely to the top of the head between the ears, right next to the hat. Attach the small green craft bell to the keychain ring as well.