I am grateful to Lybouv for providing a base pattern for this crochet Pattern!
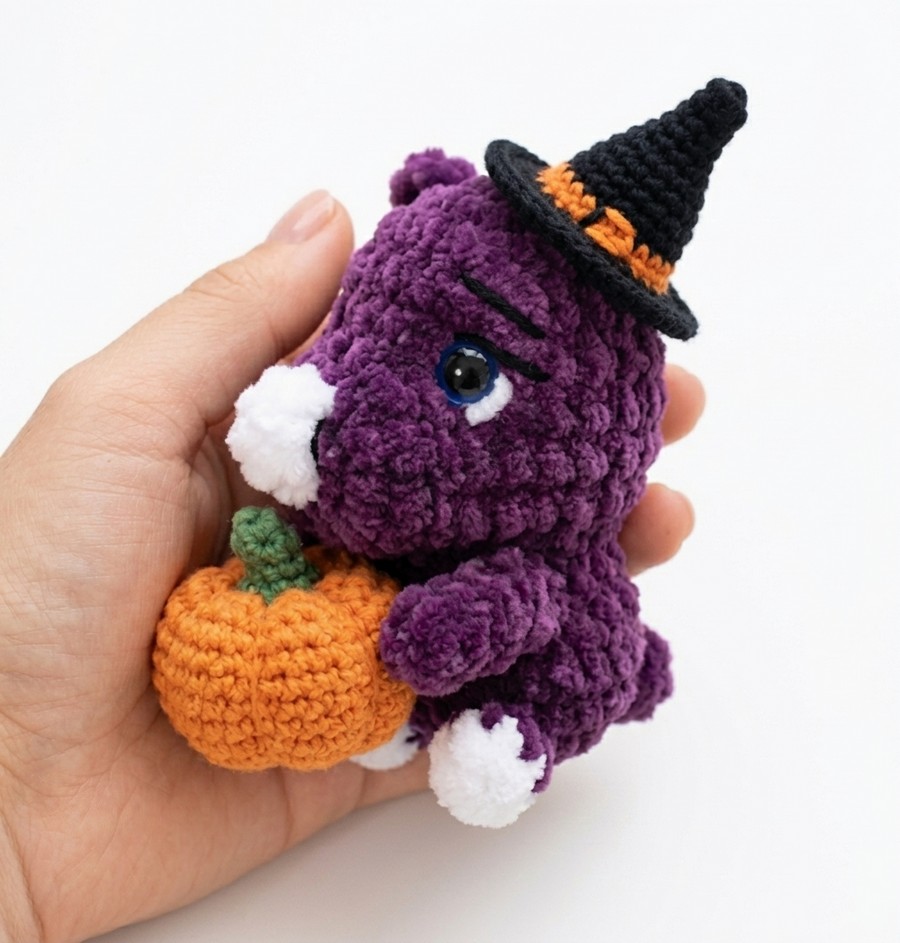
Today’s crochet tester pattern is based on a sitting Rhinoceros plushie that was previously crocheted in grey. Now, learn how to crochet a cute little plush Rhinoceros in a witch hat plushie that is no-sew and can be finished in less than 30 minutes.
This crochet plushie pattern uses super bulky cotton yarn, but the small crochet pumpkin amigurumi and the witch hat will be crocheted in DK cotton yarn.
The crochet Rhinoceros plush is also crocheted in purple instead of grey or black, as usual. It will make a unique Halloween present because I am going to popularize the crochet witch Rhinoceros plush for the first time here!
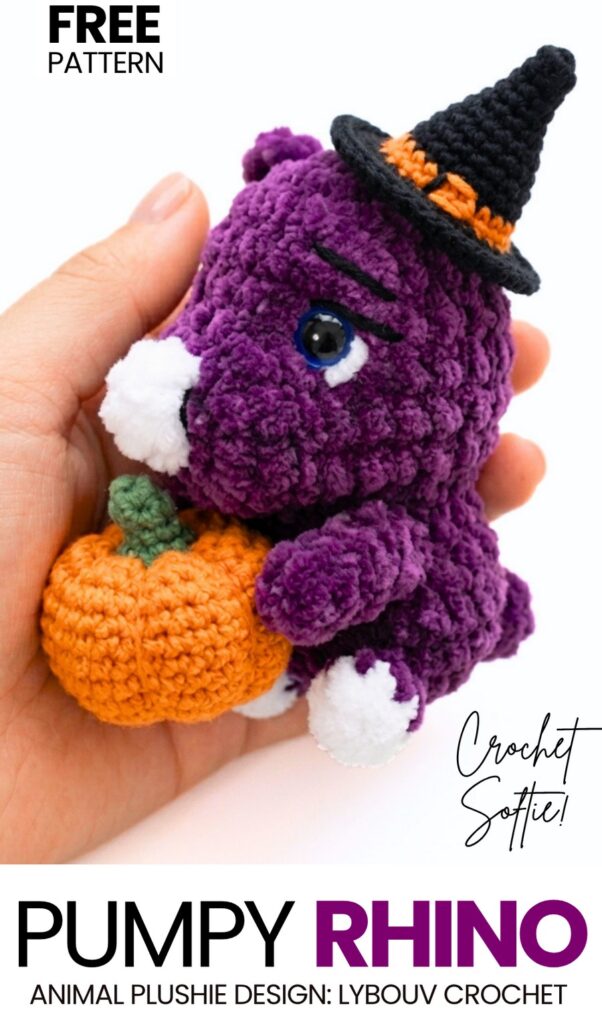
Pattern to Crochet the Rhino Animal Plushie for Kids
This is a small toy animal. It is a rhinoceros. You use soft yarn to make it. You start at the bottom and go up. You make the tail, legs, arms, and head in one piece. You do not sew parts together. You only add the horn on the face later. It is an easy and fast project.
Materials Needed
Plush Yarn (Chenille): 120m per 100g. You need a Main Color (like Dark Grey) and a Contrast Color (White).
Crochet Hook: 4.0 mm
Safety Eyes: 10 mm
Stuffing: Fiberfill
Thread: Thin black and white yarn or thread for eye details.
Tools: Yarn needle for sculpting and scissors.
About Project
This is a small toy animal. It is a rhinoceros. You use soft yarn to make it. You start at the bottom and go up. You make the tail, legs, arms, and head in one piece. You do not sew parts together. You only add the horn on the face later. It is an easy and fast project.
Stitch Abbreviations (US Terms)
MR: Magic Ring
sc: single crochet
inc: increase (2 sc in one stitch)
dec: decrease (sc 2 together)
dc-inc: double crochet increase (2 dc in one stitch)
sl st: slip stitch
ch: chain
Bobble: 3 double crochets worked into the exact same stitch with a shared top (cluster).
Step-by-Step Pattern
Body and Head You will work in a continuous spiral from the bottom up.
Round 1: Using the Main Color, make 8 sc in a MR. (8)
Round 2: Work 8 inc. (16)
Round 3: 1 sc.
Make tail: ch 2, 1 sc in the 2nd ch from the hook, sl st back into the exact same base stitch you started from.
4 sc. On the 4th sc, do not complete the stitch; change to White yarn.
Make first leg: 1 Bobble stitch in White. Change back to Main Color.
4 sc. Change to White.
Make second leg: 1 Bobble stitch in White. Change back to Main Color.
5 sc. (16 stitches in the round, not counting the tail and legs that sit on the outside)
Round 4: 16 sc around. Make sure to push the tail and legs to the outside of the work. (16)
Round 5: 6 sc. Change to White.
Make first arm: 1 Bobble stitch. Change to Main Color.
2 sc. Change to White.
Make second arm: 1 Bobble stitch. Change to Main Color.
6 sc. (16). Cut the White yarn and tie the ends securely inside the body.
Round 6: [2 sc, 1 dec] repeat 4 times. (12)
Round 7: 12 inc. This starts the head. (24)
Round 8: 10 sc, 4 dc-inc (these double crochet increases create the bump for the snout), 10 sc. (28)
Rounds 9 – 10: 28 sc around. (28)
Round 11: 10 sc, 4 dec (place these decreases right over the snout bump), 10 sc. (24)
Round 12: [2 sc, 1 dec] repeat 6 times. (18)
Action: Stuff the body firmly with fiberfill now. Do not stuff the head yet.
Round 13: 4 sc.
Make first ear: ch 4, sl st into the exact same base stitch.
10 sc.
Make second ear: ch 4, sl st into the exact same base stitch.
4 sc. (18)
Action: Insert 10 mm safety eyes between Rounds 11 and 12.
Adding the Horn
Take your White yarn and insert your hook under 2 stitches right in the middle of the snout on Round 9.
Pull up a loop and ch 2.
Make a partial double crochet under those same 2 stitches, yarn over, and pull through all loops to finish the horn.
Slip stitch to Round 10 or 11 (right above) to anchor the horn down so it lays flat against the snout. Cut the yarn, pull the tails inside the head, and tie them off.
Finishing the Head
Action: Stuff the head firmly with fiberfill.
Round 14: [1 sc, 1 dec] repeat 6 times. (12)
Round 15: 6 dec. (6)
Fasten off. Thread the yarn tail onto a needle, weave it through the front loops of the final 6 stitches, and pull tightly to close the hole. Hide the yarn tail inside.
Face Details
Eye Sculpting: Thread a needle with strong yarn. Go in through the bottom of the head, out next to one eye, cross over to the top of the eye, go through the head to the other eye, and repeat. Pull the yarn gently to sink the eyes inward, then tie the ends hidden inside.
Whites of Eyes: Embroider a small line of white thread on the outer half of each safety eye.
Eyebrows & Lashes: Embroider tiny black lines for eyelashes and slanted eyebrows using black thread.
Pattern 2: The Witch Hat (17 Rounds)
Note: This pattern is the one used to crochet the cat in a witch hat which is roughly the same!
Use Black and Orange sport/DK weight yarn and a 2.5 mm hook. By spreading the increases over 14 rounds, the hat gains a beautifully exaggerated, tall, pointy tip.
R1 (Black): 4 sc in magic ring (4)
R2: 4 sc (4) Adding this round gives the very tip its height.
R3: (1 sc, inc) x 2 (6)
R4: 6 sc (6)
R5: (2 sc, inc) x 2 (8)
R6: 8 sc (8)
R7: (3 sc, inc) x 2 (10)
R8: 10 sc (10)
R9: (4 sc, inc) x 2 (12)
R10: 12 sc (12)
R11: (5 sc, inc) x 2 (14)
R12: 14 sc (14)
R13: (Change to Orange for the band) (6 sc, inc) x 2 (16)
R14: 16 sc (16)
R15 (Change back to Black): Work in Front Loops Only (FLO) to create the sharp fold of the brim. (1 sc, inc) x 8 (24)
R16: Work in both loops. (2 sc, inc) x 8 (32)
R17: (3 sc, inc) x 8 (40)
- R18: (4 sc, inc) x 8 (48)
Finishing: Fasten off with an invisible join and weave in the ends. Use Yellow yarn and a needle to embroider a small square on the orange band for the buckle. Sew the hat onto the cat slightly off-center.
Pattern 3: The Detailed Pumpkin (13 Rounds)
Use Orange and Green sport/DK weight yarn and a 2.5 mm hook. Expanding to 13 rounds gives enough height to create deep, beautiful ridges when shaped.
R1 (Orange): 6 sc in magic ring (6)
R2: 6 inc (12)
R3: (1 sc, inc) x 6 (18)
R4: (2 sc, inc) x 6 (24)
R5-R10: 24 sc (24) (6 straight rounds to build height)
R11: (2 sc, dec) x 6 (18)
R12: (1 sc, dec) x 6 (12)
Detail: Stuff the pumpkin very firmly. It needs to be densely packed so it holds its shape when you cinch the ridges.
R13: 6 dec (6)
Creating the Pumpkin Ridges:
Fasten off, leaving an extra-long tail (about 15-20 inches).
Thread the tail onto a yarn needle.
Push the needle straight down through the top center hole (R13) and out through the bottom center hole (R1).
Pull the yarn tight down the outside of the sphere, wrapping it from bottom to top, and push the needle back down through the top center again.
Pull firmly to create a deep indent.
Repeat this process 5 to 6 times, spacing the wraps evenly around the sphere to create the iconic pumpkin segments. Knot securely at the bottom and hide the tail inside.